site_root
Настройка DCOM компоненты “Excel.Application” на 64-битном сервере приложений 1С
Описание настройки на 64-битном сервере приложений 1С, позволяющие создавать и использовать COMОбъект «Excel.Application» на сервере 1С. Это поможет обработать большие файлы excel на сервере, в том числе через фоновые задания.
- Заходим на сервер приложений 1С под локальным админом.
- Запускаем DCOMCNFG (Консоль настроек “Component Services”).
- Открываем ветку Console Root -> Component Services -> Computers -> My computer -> DCOM Config.
- Ищем “Microsoft Excel Application”.
- Если нашли, то переходим к пункту 4 (Настраиваем свойства DCOM компонента “Microsoft Excel Application”).
- Закрываем “Component Services”.
- Настройка реестра.
- Запускаем REGEDIT.
- Открываем ветку Computer\HKEY_CLASSES_ROOT\AppID\EXCEL.EXE, если ее нет, то создаем.
- Создаем в ней строковый параметр AppID = {00020812-0000-0000-C000-000000000046}.
- Выполняем команду “mmc comexp.msc /32”, которая делает то же что и DCOMCONFIG, но позволяет видеть 32 битные компоненты.
- После этого в Component Services должен появиться “Microsoft Excel Application”.
- Настраиваем свойства DCOM компонента “Microsoft Excel Application”.
- Закладка “Security”.
- “Launch and Activation Permissions” – Customize – Edit.
- Добавляем пользователя, под которым запускается агент сервера 1С.
- Назначаем ему только следующие права (allow):
- Local Launch
- Local Activation
- “Access Permissions” – Customize – Edit.
- Добавляем пользователя, под которым запускается агент сервера 1С.
- Назначаем ему только права Local Access.
- “Launch and Activation Permissions” – Customize – Edit.
- Во вкладке “Identity” должно быть выбрано “The launching user”.
- Закладка “Security”.
- Системные папки
- Папка “C:\Windows\SysWOW64\config\systemprofile\Desktop\”.
- Проверяем наличие папки , если нет – то создаем.
- Заходим в свойства этой папки.
- Закладка Security.
- Добавляем, если нет, пользователя, под которым запускается агент сервера 1С.
- Добавляем право “Read” и “Write”.
- Папка “C:\Windows\System32\config\systemprofile\Desktop\”.
- Проверяем наличие папки , если нет – то создаем.
- Заходим в свойства этой папки.
- Закладка Security.
- Добавляем, если нет, пользователя, под которым запускается агент сервера 1С.
- Добавляем право “Read” и “Write”.
- Папка “C:\Windows\SysWOW64\config\systemprofile\Desktop\”.
Корпорация Microsoft на сегодняшний день не рекомендует производить и не поддерживает автоматизацию программ из пакета Microsoft Office с помощью автоматических, неинтерактивных клиентских приложений или компонентов (включая ASP, DCOM и службы NT), поскольку при запуске в этом окружении программы пакета Office могут работать нестабильно или зависать.
Чтобы избежать проблем при работе с “битыми” файлами в режиме восстановления надо дать сразу полный доступ на папки:
- C:\Windows\SysWOW64\config\systemprofile\AppData\Local
- C:\Windows\System32\config\systemprofile\AppData\Local
пользователю, под которым запускается агент сервера 1С.
Коды ответов телефонии Q850
https://wiki.twin24.ai/voice-bots/concepts/q850-codes
Коды ответов телефонии Q850
Расшифровка кодов ошибок Q850
В отчетах о звонках отображается поле Q850 — код завершения вызова. Этот код показывает, по какой причине звонок был прерван.
Ниже — полный список возможных кодов и их расшифровок. Если вы столкнулись с какой-либо ошибкой и не можете интерпретировать ее значение — обратитесь в техподдержку.
| Код | Eng | Ru | Описание |
|---|---|---|---|
| 0 | Valid cause code not yet received. | Код причины еще не получен. | Во время установления соединения узел еще не получил достаточной информации, чтобы определить причину завершения вызова. |
| 1 | Unallocated (unassigned) number. | Вызываемый номер не найден или не существует. | Запрошенный номер действителен форматно, но не закреплен ни за каким абонентом. |
| 2 | No route to specified transit network (WAN). | Нет маршрута к указанной транзитной сети. | Была инициирована переадресация звонка, но требуемый маршрут перевода недоступен или не существует. |
| 3 | No route to destination. | Нет маршрута до назначения. | Вызываемый номер недоступен — сеть, в которой совершается звонок, не обслуживает этот номер. |
| 4 | Send special information tone. | Передача специального информационного сигнала. | Номер недоступен по постоянной причине — вызывающей стороне передается специальный информационный сигнал. |
| 5 | Misdialed trunk prefix. | Ошибочный префикс транка. | В номере допущена ошибка при наборе префикса для звонка. |
| 6 | Channel unacceptable. | Неприемлемый канал. | Выбранный канал связи не подходит для передачи данных или выполнения вызова. |
| 7 | Call awarded and being delivered in an established channel. | Вызов принят и доставлен по установленному каналу. | Абоненты подключены к одному каналу, звонок поступил на номер. |
| 8 | Prefix 0 dialed but not allowed. | Набран префикс 0, но он не разрешен. | В номере набран префикс 0, но такие звонки запрещены для этой линии или пользователя. |
| 9 | Prefix 1 dialed but not allowed. | Набран префикс 1, но он не разрешен. | Вызов не может быть выполнен, потому что номер начинается с префикса 1, который зарезервирован для специальных сервисов (например, экстренных или служебных), но его использование не разрешено из текущей сети или для этого пользователя. |
| 10 | Prefix 1 dialed but not required. | Набран префикс 1, но он не требуется. | Код возникает, если пользователь вручную добавляет префикс 1, хотя система его автоматически обрабатывает или вовсе не использует. |
| 11 | More digits received than allowed, call is proceeding. | Получено больше цифр, чем разрешено, вызов продолжается. | Пользователь набрал номер, содержащий больше цифр, чем предусмотрено настройками. Несмотря на это, сеть не прерывает соединение — вызов продолжается, возможно, с обрезкой лишних цифр. |
| 16 | Normal call clearing. | Нормальное завершение вызова. | Вызов завершен успешно — один из участников положил трубку. |
| 17 | User busy. | Вызываемый абонент занят. | Вызываемый абонент в данный момент разговаривает по телефону или занят другим соединением. |
| 18 | No user responding. | Вызываемый абонент не отвечает. | Абонент не взял трубку. |
| 19 | No answer from the user. | Нет ответа от абонента (абонент предупрежден). | Абонент получил сигнал о поступающем звонке, но не взял трубку. |
| 20 | Subscriber absent. | Абонент отсутствует. | Абонент находится вне зоны действия сети или временно недоступен. |
| 21 | Call rejected. | Вызов отклонен. | Абонент намеренно отклонил вызов — причина не связана с технической ошибкой. |
| 22 | Number changed. | Номер заменен. | Абонент сменил номер — вызываемый номер больше не обслуживается. |
| 23 | Reverse charging rejected. | Обратная тарификация отклонена. | Получатель вызова отказался оплачивать звонок, и соединение не было установлено. |
| 24 | Call suspended. | Вызов приостановлен. | Соединение не завершено, но временно остановлено — например, при удержании или переводе. |
| 25 | Call resumed. | Вызов возобновлен. | Приостановленное соединение было успешно восстановлено и продолжено. |
| 26 | Non-selected user clearing. | Завершение вызова невыбранным пользователем. | Вызов отклонен абонентом, которому он не был предназначен. |
| 27 | Destination out of order. | Пункт назначения неисправен. | Устройство вызываемой стороны или маршрут к нему не работает корректно. Этот код может возникать, если: – оборудование абонента недоступно; – сеть не может доставить вызов из-за сбоя на пути; – нарушен физический или логический канал связи. |
| 28 | Invalid number format. | Неправильный формат номера. | Вызываемый номер введен в некорректном формате. |
| 29 | Facility rejected. | Услуга отклонена. | Дополнительная услуга, затребованная пользователем, не может быть обеспечена сетью. |
| 30 | Response to STATUS ENQUIRY. | Ответ на запрос STATUS ENQUIRY. | STATUS сообщение с ответом на запрос о состоянии оборудования. |
| 31 | Normal, Unspecified. | Нормальное завершение, причина не указана. | Вызов завершен корректно, но сеть не предоставила точной причины. |
| 33 | Circuit out of order. | Линия неисправна. | Сеть не может установить соединение, потому что один из каналов (физический или логический) поврежден или не работает. |
| 34 | No circuit/channel available. | Нет свободного канала или линии. | Все возможные маршруты перегружены или временно недоступны. |
| 35 | Destination unattainable. | Пункт назначения недостижим. | Сеть не может доставить вызов до указанного номера — например, из-за отсутствия маршрута, блокировки номера, сбоев в инфраструктуре или некорректной маршрутизации. |
| 37 | Degraded service. | Ухудшение качества обслуживания. | Сеть допускает соединение, но не может обеспечить стабильную или полноценную связь. |
| 38 | Network out of order. | Сеть неисправна. | Сеть, в которой происходит вызов, неисправна, и такое состояние может продлиться долго — немедленные попытки перезвона не будут успешными. |
| 39 | Transit delay range cannot be achieved. | Диапазон задержки транзита не может быть обеспечен. | Сеть не может гарантировать нужную скорость доставки данных для соединения. |
| 40 | Throughput range cannot be achieved. | Диапазон пропускной способности не может быть обеспечен. | Сеть не в состоянии предоставить требуемую скорость передачи данных для вызова. |
| 41 | Temporary failure. | Временная неисправность. | Ошибка на стороне сети телефонии, немедленные попытки перезвона могут быть успешными. |
| 42 | Switching equipment congestion. | Перегрузка коммутационного оборудования. | Сеть перегружена и не может обработать новый вызов. |
| 43 | Access information discarded. | Информация о доступе отклонена. | Вызываемым абонентом не был получен доступ к звонку. |
| 44 | Requested circuit/channel not available. | Требуемый маршрут/канал недоступен. | Конкретный канал или ресурс, запрошенный для установки вызова, недоступен — возможно, он занят, отключен или не может быть использован по техническим причинам. |
| 45 | Pre-empted. | Прерван по приоритету. | Вызов завершен системой, чтобы освободить канал для более важного соединения. |
| 46 | Precedence call blocked. | Приоритетный вызов заблокирован. | Сеть не смогла установить вызов с высоким приоритетом из-за нехватки ресурсов или ограничений. |
| 47 | Resource unavailable – unspecified. | Ресурс недоступен — причина не указана. | Вызов не может быть установлен, потому что нужный элемент сети временно недоступен. |
| 49 | Quality of service unavailable. | Требуемое качество обслуживания не может быть обеспечено. | Сеть не может обеспечить нужные условия соединения (например, для голоса или видео). |
| 50 | The requested facility is not subscribed. | Отсутствует подписка на требуемую услугу. | Абонент запросил дополнительную услугу, на которую у него нет разрешения. На стороне оборудования услуга доступна. |
| 51 | Reverse charging not allowed. | Обратная тарификация не разрешена. | Получатель вызова не принимает оплату за входящий звонок, или услуга недоступна в сети. |
| 52 | Outgoing calls barred. | Исходящие вызовы запрещены. | Абонент не может совершать вызовы из-за ограничений со стороны оператора, тарифного плана или настроек. |
| 53 | Outgoing calls barred within Closed User Group (CUG). | Исходящие вызовы запрещены внутри замкнутой группы пользователей. | Исходящие вызовы с используемого номера запрещены настройками телефонии. |
| 54 | Incoming calls barred. | Входящие вызовы запрещены. | Сеть заблокировала попытку соединения, потому что для вызываемого абонента запрещены входящие вызовы. Это может быть связано с настройками пользователя, политикой оператора или ограничениями доступа. |
| 55 | Incoming calls barred within Closed User Group (CUG). | Входящие вызовы запрещены внутри замкнутой группы пользователей. | Входящие вызовы с используемого номера запрещены настройками телефонии. |
| 56 | Call waiting not subscribed. | Ожидание вызова не подключено. | Пользователь не активировал услугу ожидания вызова (Call Waiting), и второй вызов не может быть обработан во время разговора. |
| 57 | Bearer capability not authorized. | Функция передачи информации не разрешена. | Абонент запросил передачу информации, но разрешение на передачу информации этому абоненту отсутствует. |
| 58 | Bearer capability not presently available. | Функция передачи информации в настоящее время недоступна. | Абонент запросил передачу информации, но возможность передачи требуемых данных отстуствует. |
| 62 | Inconsistency in designated outgoing access information and subscriber class. | Несогласованность между информацией о назначенном исходящем доступе и классом абонента. | Класс абонента не соответствует требуемому классу для доступа к информации. |
| 63 | Service or option not available, unspecified. | Услуга или опция недоступна, без дополнительной информации | Сеть отклонила запрос, но не указала, почему нужная функция недоступна. |
| 65 | Bearer service not implemented. | Услуга передачи не реализована. | Сеть не поддерживает указанный тип соединения, например, голосовой или факсимильный вызов. |
| 66 | Channel type not implemented. | Тип канала не реализован. | Оборудование не поддерживает требуемый тип канала. |
| 67 | Transit network selection not implemented. | Выбор транзитной сети не реализован. | Сеть не поддерживает обработку вызова с указанием конкретного промежуточного оператора. |
| 68 | Message not implemented. | Сообщение не реализовано. | Сеть получила допустимый тип сообщения, но не поддерживает его обработку. |
| 69 | The requested facility is not implemented. | Запрошенная функция не реализована. | Сеть или оборудование не поддерживают требуемую услугу или возможность. |
| 70 | Only restricted digital information bearer capability is available (national use). | Доступна только ограниченная функция передачи цифровой информации. | Абонент запросил неограниченную передачу информации, но на стороне оборудования есть ограничения. |
| 79 | Service or option not implemented, unspecified. | Сервис или услуга не реализованы, без дополнительной информации. | Запрошенная дополнительная функция или услуга (например, переадресация, удержание, видеосвязь) не поддерживается сетью или оборудованием, но точная причина не уточняется. |
| 81 | Invalid call reference value. | Недействительное значение ссылки на вызов. | Сеть не распознает указанный идентификатор и не может продолжить обработку вызова. |
| 82 | The identified channel does not exist. | Указанный канал не существует. | Сеть не может установить вызов, потому что заданный канал не распознан или отсутствует. |
| 83 | A suspended call exists, but this call identity does not. | Существует приостановленный вызов, но отсутствует его идентификатор. | Среди текущих приостановленных вызовов не найден вызов с переданным идентификатором. |
| 84 | Call identity in use. | Идентификатор вызова уже используется. | Уже существует активный вызов с переданным идентификатором. |
| 85 | No call suspended. | Нет приостановленного вызова. | Попытка возобновить вызов не удалась, потому что в системе нет приостановленного соединения. |
| 86 | Call having the requested call identity has been cleared. | Вызов с указанным идентификатором уже завершен. | Попытка управления вызовом невозможна, так как соединение уже закрыто. |
| 87 | Called user not member of CUG. | Вызываемый абонент не является членом CUG. | Вызов отклонен, потому что номер не входит в закрытую группу, доступную вызывающему абоненту. |
| 88 | Incompatible destination. | Несовместимый пункт назначения. | Вызов не может быть доставлен, потому что тип соединения не поддерживается на стороне получателя. |
| 89 | Non-existent abbreviated address entry. | Несуществующая сокращённая запись адреса. | Указан короткий номер или псевдоним, которого нет в адресной книге или маршрутизации. |
| 90 | Destination address missing, and direct call not subscribed. | Отсутствует адрес назначения, и прямая маршрутизация не подключена. | Сеть не знает, куда направить вызов, потому что не указан номер и не активирована услуга прямого вызова. |
| 91 | Invalid transit network selection (national use). | Неправильный выбор транзитной сети. | Переданная идентификация транзитной сети имеет неправильный формат. |
| 92 | Invalid facility parameter. | Неверный параметр функции. | В сообщении передано недопустимое значение для дополнительной услуги, например переадресации или удержания. |
| 93 | Mandatory information element is missing. | Отсутствует обязательный информационный элемент. | В сообщении не хватает одного или нескольких обязательных параметров, необходимых для обработки вызова. |
| 95 | Invalid message, unspecified. | Неверное сообщение, причина не указана. | Сеть не смогла обработать сообщение из-за ошибки, но не уточнила ее природу. |
| 96 | Mandatory information element is missing. | Отсутствует обязательный информационный элемент. | Сеть получила сообщение, в котором отсутствует один или несколько обязательных параметров. Без этих данных сообщение не может быть обработано, и вызов завершается с ошибкой. |
| 97 | Message type non-existent or not implemented. | Тип сообщения не существует или не реализован. | Сеть не распознает полученную команду и не может ее обработать. |
| 98 | Message not compatible with call state or message type nonexistent or not implemented. | Сообщение не совместимо с состоянием вызова или его тип не существует или не реализован. | Сеть не может обработать команду — либо она пришла не вовремя, либо вообще не поддерживается. |
| 99 | An information element or parameter does not exist or is not implemented. | Информационный элемент не существует или не реализован. | Сеть получила неизвестный параметр, который не может быть обработан. |
| 100 | Invalid information element contents. | Неверное содержимое информационного элемента. | В сообщении присутствует обязательный параметр, но его содержимое некорректно — например, содержит недопустимое значение, формат или нарушает правила кодировки. Сеть не может его интерпретировать и завершает вызов. |
| 101 | Message in the invalid call state. | Сообщение не соответствует состоянию вызова. | Сеть получила сообщение, которое невозможно обработать в текущем состоянии вызова. Например, попытка завершить вызов, который еще не был установлен, или запрос на удержание к уже завершенному соединению. |
| 102 | Recovery on timer expiry. | Восстановление по истечении таймера. | Сеть не дождалась ответа и автоматически прервала или сбросила соединение. |
| 103 | Parameter non-existent or not implemented – passed on. | Параметр не существует или не реализован — передан дальше. | Сеть проигнорировала неизвестный параметр и продолжила обработку вызова. |
| 111 | Protocol error unspecified. | Ошибка протокола, причина не указана. | В процессе установления или обработки вызова возникла ошибка на уровне сигнализации (например, SIP или ISDN), но точная причина не указана. |
| 127 | Internetworking, unspecified. | Межсетевое взаимодействие, причина не указана. | Вызов не выполнен из-за ошибки при обмене между разными сетями или технологиями. |
Сравнительная Таблица Сетевых Моделей (OSI и TCP/IP)
| Уровень OSI (7 уровней) | Уровень TCP/IP (4 уровня) | Единица Данных (PDU) | Назначение | Примеры Протоколов |
|---|---|---|---|---|
| 7. Прикладной (Application) | 4. Прикладной (Application) | Данные (Data) | То, что видит пользователь. Здесь работают программы и сервисы. | HTTP, HTTPS, FTP, SMTP, DNS, SSH, IMAP, POP3, TFTP, NTP, DHCP, SNMP, BGP, RIP |
| 6. Представления (Presentation) | Функции объединены в Прикладном уровне TCP/IP | Данные (Data) | Переводчик и шифровальщик. Обеспечивает понятность данных (шифрование, сжатие, кодировка). | TLS/SSL, ASN.1, XDR, MIME |
| 5. Сеансовый (Session) | Функции объединены в Прикладном уровне TCP/IP | Данные (Data) | Организат��р сеанса. Устанавливает, поддерживает и завершает сеанс связи. | NetBIOS, RPC, PPTP, SOCKS, SDP |
| 4. Транспортный (Transport) | 3. Транспортный (Transport) | Сегмент (Segment) / Датаграмма (Datagram) | Почтальон. Отвечает за доставку данных от одного приложения к другому. Решает, нужна ли надежность (TCP) или скорость (UDP). | TCP, UDP, SCTP, QUIC |
| 3. Сетевой (Network) | 2. Межсетевой (Internet) | Пакет (Packet) | Навигатор. Отвечает за маршрутизацию — находит лучший путь для данных через разные сети. | IP (IPv4, IPv6), ICMP (служебный), OSPF, EIGRP, IPsec, GRE, IGMP |
| 2. Канальный (Data Link) | 1. Доступа к Сети (Network Access) | Кадр (Frame) | Дорожный инспектор. Отвечает за доставку данных в пределах одной локальной сети. Использует MAC-адреса. | Ethernet, Wi-Fi, PPP, HDLC, Frame Relay, STP, LACP, PPPoE |
| 1. Физический (Physical) | Входит в уровень Доступа к Сети | Бит (Bit) | Провода и сигналы. Отвечает за физическую передачу битов. | Кабели (медные, оптоволокно), Радиоволны, Хабы, USB, RS-232 |
Таблица Сетевых Протоколов и Технологий
| Протокол / Технология | Уровень OSI / TCP-IP | Основное Назначение | Как Работает (Ключевые Детали) | Риски Безопасности / Уязвимости | Инструменты и Команды |
|---|---|---|---|---|---|
| Ethernet (IEEE 802.3) | L1 (Физ.) / L2 (Кан.) | Проводная передача данных в локальной сети (LAN). | Определяет формат кадров (Frames) и MAC-адресацию. | VLAN Hopping, ARP Spoofing, MAC Flooding. | ip link, ethtool, wireshark |
| Wi-Fi (IEEE 802.11) | L1 (Физ.) / L2 (Кан.) | Беспроводная передача данных в локальной сети. | Использует радиоволны (2.4/5/6 ГГц) для передачи данных. | WPA2/WPA3 Cracking, Evil Twin, Deauthentication Attacks. | aircrack-ng, iw, iwconfig |
| WPA2/WPA3 | L2 (Канальный) | Протоколы безопасности для защиты Wi-Fi сетей. | WPA2: шифрование AES (CCMP). WPA3: улучшенная защита (SAE), защита от брутфорса. | WPA2: KRACK Attack, PMF Bypass. WPA3: Dragonblood, Downgrade Attacks. | aircrack-ng, wpa_supplicant |
| ARP (Address Resolution Protocol) | L2 (Канальный) | Находит физический адрес (MAC) устройства по его логическому адресу (IP) в локальной сети. | Broadcast-запрос (кто имеет IP X, скажи свой MAC) и Unicast-ответ. | ARP Spoofing (MITM), ARP Cache Poisoning. | arp -a, arping, wireshark |
| STP/RSTP/MSTP (Spanning Tree Protocol) | L2 (Канальный) | Предотвращает петли в сетях с избыточными путями (коммутаторы). | Строит древовидную топологию, блокируя избыточные порты. RSTP — быстрая конвергенция. | Root Bridge Hijacking, BPDU Flooding, DoS. | Switch CLI, tcpdump |
| LACP (Link Aggregation Control Protocol) | L2 (Канальный) | Объединяет несколько физических каналов в один логический для увеличения пропускной способности. | Динамическое управление агрегацией каналов (802.3ad). | Misconfiguration, Hash Collision. | ip link, Switch CLI |
| PPPoE (PPP over Ethernet) | L2 (Канальный) | Инкапсуляция PPP-кадров в Ethernet для подключения к провайдеру (DSL). | Добавляет аутентификацию и управление сессией поверх Ethernet. | Session Hijacking, Credential Theft. | pppoeconf, pppd |
| IPv4 / IPv6 | L3 (Сетевой) | Доставка данных между разными сетями (маршрутизация). | IPv4: 32-битные адреса. IPv6: 128-битные адреса, автоконфигурация (SLAAC). | IP Spoofing, Fragmentation Attacks, NDP Spoofing (IPv6). | ping, traceroute, ip route, ndp (для IPv6) |
| ICMP (Internet Control Message Protocol) | L3 (Сетевой) | Диагностика и передача служебных сообщений об ошибках. | Используется командами ping и traceroute. Не имеет портов. | ICMP Flood (DoS), ICMP Tunneling (передача данных через ICMP). | ping, traceroute, hping3 |
| BGP (Border Gateway Protocol) | L7 (Прикладной) | Протокол динамической маршрутизации между автономными системами (Интернетом). | Использует TCP (порт 179). Выбирает путь на основе политик и атрибутов. | BGP Hijacking, Route Leaks. | show ip bgp, bird, quagga |
| RIP (Routing Information Protocol) | L7 (Прикладной) | Протокол динамической маршрутизации внутри автономной системы (IGP). | Использует UDP (порт 520). Простой алгоритм на основе счетчика переходов. | Route Poisoning, Authentication Bypass. | show ip rip, frr |
| OSPF (Open Shortest Path First) | L3 (Сетевой) | Протокол динамической маршрутизации внутри автономной системы (IGP). | Использует алгоритм Дейкстры (SPF). Работает поверх IP (протокол 89). | LSA Spoofing, Authentication Bypass. | show ip ospf, frr |
| IPsec (Internet Protocol Security) | L3 (Сетевой) | Набор протоколов для защиты IP-трафика (шифрование, аутентификация). | Режимы: Транспортный и Туннельный. Протоколы: AH и ESP. | Weak IKE Config, Side-channel Attacks. | strongswan, ipsec status |
| TCP (Transmission Control Protocol) | L4 (Транспортный) | Надежная доставка данных с установкой соединения. | 3-way handshake (SYN, SYN-ACK, ACK). Контроль потока и ошибок. | SYN Flood, Session Hijacking, Sequence Number Prediction. | netstat, ss, tcpdump |
| UDP (User Datagram Protocol) | L4 (Транспортный) | Быстрая доставка данных без установки соединения и гарантий. | Минимальный заголовок. Нет подтверждения доставки. | UDP Flood, Amplification Attacks (DNS/NTP). | nc -u, iperf3 |
| QUIC | L4/L7 (Гибридный) | Современный протокол поверх UDP для ускорения веба (HTTP/3). | Объединяет функции TCP и TLS. Уменьшает задержки (0-RTT). | Amplification Attacks, Connection ID Tracking. | wireshark, curl --http3 |
| HTTP / HTTPS | L7 (Прикладной) | Передача гипертекста (веб-страниц). HTTPS — защищенная версия. | HTTP: порт 80. HTTPS: порт 443 (TLS). Методы: GET, POST, PUT, DELETE. | SQL Injection, XSS, CSRF, Insecure TLS Config. | curl, httpie, burp suite |
| DNS (Domain Name System) | L7 (Прикладной) | Преобразует доменные имена (google.com) в IP-адреса. | Использует UDP/TCP (порт 53). TCP/53 используется для передачи зон, больших ответов (>512 байт) и DNS-over-TCP. | DNS Cache Poisoning, DNS Tunneling, DDoS (Amplification). | dig, nslookup, host |
| DHCP (Dynamic Host Configuration Protocol) | L7 (Прикладной) | Автоматическое назначение IP-адресов и настроек сети устройствам. | Процесс DORA (Discover, Offer, Request, Acknowledge). Порты 67/68. | DHCP Starvation, Rogue DHCP Server. | dhclient, nmap --script discovery |
| SSH (Secure Shell) | L7 (Прикладной) | Безопасный удаленный доступ к устройствам и передача файлов. | Порт 22. Шифрование трафика, аутентификация по ключам. | Brute-force, Man-in-the-Middle (если не проверен Fingerprint). | ssh, scp, sftp |
| FTP / SFTP | L7 (Прикладной) | Передача файлов. FTP — небезопасный, SFTP — через SSH. | FTP: порты 20/21. SFTP: порт 22. | FTP: Cleartext Credentials, Bounce Attack. | ftp, sftp, filezilla |
| SMTP / IMAP / POP3 | L7 (Прикладной) | Протоколы электронной почты (отправка и получение). | SMTP (25/465/587), IMAP (143/993), POP3 (110/995). | Email Spoofing, Open Relay, Credential Theft. | telnet, openssl s_client |
| SNMP (Simple Network Management Protocol) | L7 (Прикладной) | Мониторинг и управление сетевыми устройствами. | Использует UDP (порты 161/162). Версии: v1, v2c, v3 (безопасная). | SNMP Brute-force (Community Strings), Amplification Attacks. | snmpwalk, snmpget |
| NTP (Network Time Protocol) | L7 (Прикладной) | Синхронизация времени между устройствами. | Использует UDP (порт 123). Высокая точность. | NTP Amplification (DDoS), Time Spoofing. | ntpdate, chronyc |
Использование нескольких мониторов
При работе на ноутбуке с подключенным внешним монитором или на ПК с несколькими мониторами, часто возникает ситуация при которой мониторы используются неоптимально, в связи с чем возникает “мыльная” или “зернистая” картинка, нечеткое изображение и прочие артефакты.
Данная ситуация вызвана тем что внешний монитор работает по умолчанию в режиме Повторения основного экрана, подстаиваясь при этом под настройки основного, и если основной экран меньше внешний монитор работает не оптимально.

Корректная работа нескольких мониторов
Самый простой способ исправить проблему перевести режим отображения на “только второй экран” используя сочетание клавишь WIN+P и выбрав соотвествующий пункт в появившемся меню.

В режиме “Только второй экран” основной экран ноутбука отключается, а внешний монитор переключается в оптимальные настройки.
Кроме того существует третий вариант: “Расширить”
В этом режиме оба монитора работают в оптимальном режиме, и каждый экран имеет свой независимый рабочий стол на котором можно разместить любые дополнительные окна.
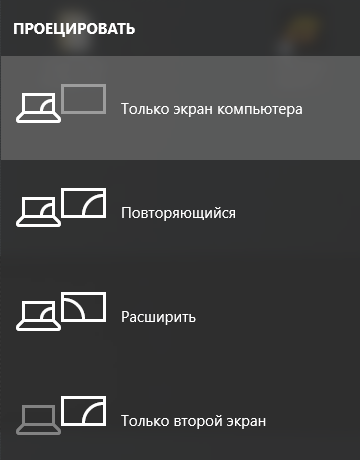
Прошу обратить отдельное внимание, если вы вносите изменения в режим работы мониторов на вашем ПК, изменения на сервере терминалов не всегда могут вступить в силу в текущей сессии, чтобы изменения применились и в окне сервера терминалов, необходимо выполнить завершение сеанса через ярлык на удаленном рабочем столе и зайти заново.
Публикация базы 1с из консоли
touch /etc/apache2/conf-available/testbd.conf
/opt/1cv8/x86_64/8.3.27.1688/webinst -apache24 -wsdir testbd -dir /var/www/html/testbd -connstr ‘Srvr=”srv-1c.examlpe.com”;Ref=”testbd”;’ -confPath /etc/apache2/conf-available/testbd.conf
a2enconf testbd.conf
systemctl reload apache2.service
Настройка мониторинга Microsoft SQL в Zabbix
Содержание скрыть
2 Настройка мониторинга Microsoft SQL в Zabbix
Законспектирую еще один момент — как выполняется настройка мониторинга Microsoft SQL в Zabbix. Я буду использовать вот этот шаблон, который доступен уже «из коробки».
Описание окружения
Версия сервера Zabbix — Zabbix 6.4.8.
Версия MS SQL сервера — SQL Server 2019 CU 23 (15.0.4335.1).
Имя экземпляра SQL — MSSQLSERVER (экземпляр по умолчанию).
Прослушиваемый TCP-порт — 1433.
Настройка мониторинга Microsoft SQL в Zabbix
Выполним настройку:
1. Сначала я создам отдельного SQL пользователя, от имени которого Zabbix будет подключаться к SQL серверу.

2. Также я включу проверку подлинности Windows и SQL в свойствах SQL сервера.

3. После изменения параметров аутентификации потребуется перезапуск сервиса SQL.

4. Назначьте необходимые разрешения для пользователя:
USE msdb;
CREATE USER zabbix FOR LOGIN zabbix;
GRANT SELECT ON OBJECT::msdb.dbo.sysjobs TO zabbix;
GRANT SELECT ON OBJECT::msdb.dbo.sysjobservers TO zabbix;
GRANT SELECT ON OBJECT::msdb.dbo.sysjobactivity TO zabbix;
GRANT EXECUTE ON OBJECT::msdb.dbo.agent_datetime TO zabbix;
USE master;
GRANT VIEW SERVER STATE TO zabbix;
GRANT VIEW ANY DEFINITION to zabbix;5. Установить ODBC драйвер. На моем сервере Zabbix установлена ОС Ubunt Server 22.04. Соответственно в моем случае команда по установке ODBC драйвера следующая:
if ! [[ "18.04 20.04 22.04 23.04" == *"$(lsb_release -rs)"* ]];
then
    echo "Ubuntu $(lsb_release -rs) is not currently supported.";
    exit;
fi

curl https://packages.microsoft.com/keys/microsoft.asc | sudo tee /etc/apt/trusted.gpg.d/microsoft.asc

curl https://packages.microsoft.com/config/ubuntu/$(lsb_release -rs)/prod.list | sudo tee /etc/apt/sources.list.d/mssql-release.list

sudo apt-get update
sudo ACCEPT_EULA=Y apt-get install -y msodbcsql18
# optional: for bcp and sqlcmd
sudo ACCEPT_EULA=Y apt-get install -y mssql-tools18
echo 'export PATH="$PATH:/opt/mssql-tools18/bin"' >> ~/.bashrc
source ~/.bashrc
# optional: for unixODBC development headers
sudo apt-get install -y unixodbc-dev
6. Также нужно настроить ODBC подключение.
nano /etc/odbc.iniЯ добавлю следующие параметры подключения:
[SPS01]
Driver = ODBC Driver 18 for SQL Server
Server =  10.10.10.79
Port = 1433
TrustServerCertificate = yes
SPS01 — это имя подключения, которое необходимо будет указать в макросах при настройке шаблона. Можете указать любое. Server — IP-адрес сервера SQL. При необходимости скорректируйте порт для подключения.
7. Теперь соберем весь пазл воедино — добавим хост с MS SQL в Zabbix, привяжем шаблон и скорректируем макросы. Сначала я добавлю хост в мониторинг и привяжу шаблон «MSSQL by ODBC».

8. Затем я скорректирую следующие макросы:
- {$MSSQL.DSN}
- {$MSSQL.PASSWORD}
- {$MSSQL.USER}

9. Сохраните внесенные изменения.
Проверка
Проще всего перейти в раздел с отображением последних полученных данных и выполнить проверку.
Пример успешного сбора данных с сервера MS SQL:

Настройка мониторинга Microsoft SQL в Zabbix завершена.
Если что-то пошло не так
Не всегда решение получается настроить так быстро, как хотелось бы. Такое бывает.
Первое, что я бы проверим — это доступность порта SQL сервера со стороны Zabbix сервера.
nc -zv 10.10.10.79 1433Пример успешного подключения:
Connection to 10.10.10.79 1433 port [tcp/ms-sql-s] succeeded!
Также можно выполнить проверку подключения через ODBC драйвер напрямую:
isql -v SPS01 zabbix Qwerty123Пример неудачного подключения:
[28000][unixODBC][Microsoft][ODBC Driver 18 for SQL Server][SQL Server]Login failed for user 'zabbix'.
[ISQL]ERROR: Could not SQLConnect
Пример удачного подключения:
+---------------------------------------+
| Connected!                            |
|                                       |
| sql-statement                         |
| help [tablename]                      |
| quit                                  |
|                                       |
+---------------------------------------+
SQL> 
Cisco Catalyst 9800-CL Cloud Wireless Controller Installation Guide
Chapter: Installing the Controller in Microsoft Hyper-V Hypervisor
Chapter Contents
- Microsoft Hyper-V Support Information
- Installation Requirements for Microsoft Hyper-V
- Creating the VM
- Configuring the VM Settings
- Launching the VM to Boot the Controller
- Configuring Tagged Ports
- Creating a Bootstrap Day0 Configuration
Microsoft Hyper-V Support Information
The Catalyst 9800-CL Cloud Wireless Controller installation on Microsoft Hyper-V requires the manual creation of a VM and installation, using the .iso file.
The following Microsoft Hyper-V features are supported:
- Snapshot
- Export
- Hyper-V Replica
For more information about Microsoft Hyper-V, see the Microsoft documentation.
 Note Note | While running Microsoft Hyper-V VM, you may get the following traceback log continuously in the console: "PLATFORM_INFRA-5-IOS_INTR_OVER_LIMIT_HIGH_STIME: IOS thread blocked due to SYSTEM LEVEL ISSUE"To avoid this issue, perform the following steps:Configure the controller in serial mode, using the commands given below.Device# configure terminal Device(config)# platform console serial Device(config)# end Device# reloadRun the following command:PS C:\> Set-VMComPort TestVM 1 \\.\pipe\TestPipeUse Putty in administrative mode to access the console. |
Installation Requirements for Microsoft Hyper-V
Before installing the controller on a Microsoft Hyper-V VM, the following must be installed on the host:
- Hyper-V Manager
- Failover Cluster Manager
- Virtual Switch
| Note | We recommended that you create the Virtual Switch prior to creating the VM. |
The hardware profiles and the recommended resources are listed in the following table:
| Settings | Ultra-Low | Small | Medium | Large |
|---|---|---|---|---|
| Minimum Number of vCPUs | 2 | 4 | 6 | 10 |
| Minimum Memory | 6 GB | 8 GB | 16 GB | 32 GB |
| Required Storage | 16 GB | 16 GB | 16 GB | 16 GB |
| Minimum Number of vNICs | 2 | 2 | 2 | 2 |
| Maximum Access Points | 100 | 1,000 | 3,000 | 6,000 |
| Maximum Clients Support | 1,000 | 10,000 | 32,000 | 64,000 |
Creating the VM
Perform the following to create the VM:
| Note | You can install the controller on Microsoft Hyper-V using Microsoft Hyper-V Manager or Microsoft System Center VMM. |
Procedure
| Step 1 | In Hyper-V Manager, click the host. |
| Step 2 | Choose New > Virtual Machine. |
| Step 3 | Click Specify Name and Location.Enter the name of the VM.(Optional) Click the checkbox to store the VM in a different location. |
| Step 4 | Click Next. |
| Step 5 | In the Specify Generation window, specify the generation of the machine to be loaded.Note The choice of Generation 1 or Generation 2 depends on your requirements. Generation 2 supports advance features like boot from Small Computer System Interface (SCSI), secure boot, higher hardware limits, Unified Extensible Firmware Interface (UEFI) BIOS, GUID Partition Table (GPT) partitioning, and so on. If Generation 2 is selected, and the Cisco C9800 IOS image version is below 17.6, unselect the Enable Secure Boot checkbox after the deployment, as the controller does not support secure boot. However, if the Cisco C9800 IOS image version is 17.6 or higher, secure boot is supported. Therefore, when Generation 2 is selected, the Enable Secure Boot option is enabled by default. |
| Step 6 | In the Assign Memory window, enter the Startup Memory value.The controller requires 8196 MB for the startup memory. |
| Step 7 | Click Next. |
| Step 8 | In the Configure Networking window, select a network connection to the virtual switch that was previously created.The network adapter selected in this step will become the first interface for the controller when the VM is launched and the router boots. The other vNICs for the VM are created in the next procedure. |
| Step 9 | Click Next. |
| Step 10 | In the Connect Virtual Hard Disk Screen window, select the following option:Attach a virtual hard disk later.Note The New Virtual Machine Wizard only supports creating a virtual hard disk using the .vhdx format. The controller requires that the hard disk uses the .vhd format. Create the virtual hard disk after the VM has been created. |
| Step 11 | Click Next.The Summary screen is displayed. |
| Step 12 | Review the VM settings and click Finish.The new VM is created. |
Configuring the VM Settings
Perform the following procedure to configure the VM settings before launching the VM:
Before you begin
Before launching the instance, add the network adapters (as required), disk, and load the .iso image in to the disk drive.
We recommended that you create and use separate network interfaces for Management, Wireless Management and High Availability. In case of HA deployments, create 3 network interfaces and attach the VM to the appropriate networks. For non-HA deployments, create 2 network interfaces.
The creation of management, wireless management and HA networks should be done before launching VM. The IP addressing on these interfaces could be either static or DHCP and should be configured as part of the bootstrap configuration.
The order in which the networks are attached to the interface is important as the first network attached is used for Management, second for Wireless Management (unless configured explicitly) and third for the HA.
Procedure
| Step 1 | In Hyper-V Manager, select the host, and right-click the VM created earlier. |
| Step 2 | Choose Settings. |
| Step 3 | Specify the number of virtual processors, also known as virtual CPUs (vCPUs) for the VM. |
| Step 4 | Under IDE Controller 0, select the Hard Drive.Click the Virtual Hard Disk check box and click New to create a new virtual hard disk.The New Virtual Hard Disk Wizard opens. Click Next.On the Choose Disk Format page, click the VHD check box to create the virtual hard disk using the .vhd format. Click Next.On the Choose Disk Type page, click Fixed Size and Next.Specify the Name and Location for the virtual hard disk. Click Next.On the Configure Disk page, click the option to create a new blank virtual hard disk. For the size, specify 16 GB.Click Next to view the Summary of the virtual hard disk settings.Click Finish to create the new virtual hard disk.When the new hard disk has been created, continue configuring the VM settings with the next step. |
| Step 5 | Under IDE Controller1, choose DVD Drive.The DVD Drive screen is displayed.For the Media setting, check the Image File check box, and browse the .iso file downloaded from Cisco.com. |
| Step 6 | Click Ok. |
| Step 7 | Choose Network Adapter to verify that the network connection to the virtual switch is configured. |
| Step 8 | Choose Com 1 to configure the serial port.This port provides access to the controller console. |
| Step 9 | Choose Hardware > Add Hardware to add the network interfaces (vNICs) to the VM.Choose Network Adapter and click Add.Microsoft Hyper-V adds the network adapter and highlights that hardware with the status Virtual Switch “Not Connected”.Select a virtual switch in the drop-down menu to place the network adapter into it.Repeat the steps for each vNIC. The controller supports only the HV NETVSC vNIC type. The maximum number of vNICs supported is 8.Note The hot-add of vNICs is not supported with Microsoft Hyper-V, so the network interfaces need to be added before launching the VM.After the controller boots, you can verify vNICs and map them to the interfaces using the show platform software vnic-if interface-mapping command. |
| Step 10 | Click BIOS to verify the boot sequence for the VM.The VM should be set to boot from the CD. |
Launching the VM to Boot the Controller
Perform the following procedure to launch the VM:
Procedure
| Step 1 | Select the virtual switch. |
| Step 2 | Select the VM and click Start.The Hyper-V Manager connects to the VM, and starts the launch process. Once the VM is launched, the controller starts the boot process |
Configuring Tagged Ports
The tagged port configuration is done on the host OS. By default, the VLAN tagged packets are dropped at the host OS at the vNIC. To allow these packets through to the controller, set the specific vNIC on the controller as tagged.
| Note | If you use Web UI to create network interfaces, you cannot specify interface names and all the interfaces will be named as Network Adapter. So, using these commands, all the network adapters in the controller can be converted to tagged. |
These commands are to be entered in a Power Shell.
Procedure
| Step 1 | To see the list of adapters and assignment, use the following script:Get-VMNetworkAdapter -VMName <C9800-name>Note To rename the adapter name, use the following command:Rename-VMNetworkAdapter -VMName <C9800-name> -Name '<C9800-adapter-name>' -NewName 'Eth1'Here, Eth1 is the adapter name. |
| Step 2 | To configure Ethernet1 (data port/management) as Trunk, with Native VLAN id as 0, use the following script:Set-VMNetworkAdapterVlan -VMName “C9800” -VMNetworkAdapterName Eth1 -Trunk -AllowedVlanIdList “1-4000” -NativeVlanId 0 |
| Step 3 | To configure Ethernet0 (serial port) as access or untagged, use the following script:Set-VMNetworkAdapterVlan -VMName “C9800” -VMNetworkAdapterName Eth0 -Untagged |
| Step 4 | Enable MAC address spoofing to allow the trunk port to pass the tagged traffic.To enable MAC address spoofing, perform the following:Select the virtual machine and choose Actions > Settings.Expand Network Adapter and choose Advanced Features.Select Enable MAC Address spoofing. |
Creating a Bootstrap Day0 Configuration
Perform the following to create a bootstrap Day 0 configuration in the Linux server:
Procedure
| Step 1 | Create iosxe_config.txt or ovf-env.xml file. |
| Step 2 | Create a disk image from this file using the following command:mkisofs -l -o ./c9800_config.iso <configuration_filename> |
| Step 3 | Mount the c9800_config.iso as an additional disk during creation of the virtual machine and power on the VM. |
delete obsolete 1c clients
$obsolete1c = “{4C070411-F5ED-8D13-1D93-F9B0EEC933C6}”, “{D5E3CEC7-E1D4-4E5D-AEE1-7B0AE6BE4EC9}”, “{9289DD3A-4103-4CBA-BA3E-C82D128170A2}”, “{E464A62A-6564-48FE-BFB1-F0B9D024C91A}”, “{08D67508-5873-468A-9CE9-DADE09BB3F52}”, “{BA6F5BE2-46F2-4B88-86EC-EEC81A54DA63}”, “{A28F6B5C-8581-4C16-8714-D6397789DA5E}”, “{68078560-1146-433D-BC90-5AD7D741860E}”, “{AF996617-CB3A-4670-8AE9-C36FFDD3C41F}”, “{A09609F5-CF09-4118-A75D-A51EA994F708}”, “{70485E78-5A21-42FC-B41B-F850AAA22385}”
$regroot=”HKLM:\SOFTWARE\WOW6432Node\Microsoft\Windows\CurrentVersion\Uninstall\”
foreach ($ver in $obsolete1c) {
$registryPath = $regroot + $ver
if (Test-Path -Path $registryPath) {
Write-Host “Registry key ‘$registryPath’ exists.”
Start-Process -FilePath “msiexec.exe” -ArgumentList “/x "$ver” /qn” -Wait -NoNewWindow
Start-Sleep -Seconds 30
} else {
Write-Host “Registry key ‘$registryPath’ does not exist.”
}
}
Public IPs
https://gist.githubusercontent.com/iamwildtuna/7772b7c84a11bf6e1385f23096a73a15/raw/f18bfc6391ea14e0ee92a2145669b2fc4887ca43/gistfile2.txt
Meta (Instagram, Facebook)
// Узлы
157.240.253.174, 157.240.253.172, 157.240.253.167, 157.240.253.63, 157.240.253.32
157.240.252.174, 157.240.252.172, 157.240.252.167, 157.240.252.63, 157.240.252.38
57.144.112.34, 57.144.110.1, 157.240.205.174, 87.245.223.97
// Подсети
213.102.128.0/24
204.15.20.0/22
199.201.0.0/16
185.89.0.0/16
185.60.0.0/16
179.60.0.0/16
173.252.0.0/16
164.163.191.64/26
163.114.0.0/16
163.77.128.0/17
163.70.0.0/16
157.240.0.0/16
147.75.0.0/16
142.250.0.0/15
129.134.0.0/16
103.4.0.0/16
102.221.0.0/16
102.132.0.0/16
99.84.0.0/16
87.245.208.0/24
74.119.0.0/16
69.171.0.0/16
69.63.0.0/16
66.220.0.0/16
45.64.0.0/16
31.13.0.0/16
157.240.0.0/24
157.240.251.0/24
157.240.205.0/24
173.194.10.0/24
77.240.43.0/24
57.144.222.0/24
45.130.4.0/24
57.144.96.0/19
57.144.244.0/24
157.240.201.0/24
31.13.72.0/24
57.144.248.0/24
// Узлы и подсети
68.232.32.0/20
199.232.0.0/16
146.75.0.0/16
54.240.186.247
54.192.98.249
65.9.48.253
18.165.126.254
108.156.13.243
13.33.247.243
54.230.216.248
199.59.243.223
18.66.123.241
151.101.0.0/16
18.66.95.249
104.244.40.0/21
108.157.229.247
34.64.0.0/10
18.160.187.253
13.225.15.250
99.86.92.242
13.225.33.247
13.249.5.250
143.204.221.250
104.244.42.0/24
152.199.21.141 // images
93.184.220.70 // images
192.229.233.50 // images
104.18.37.127 // images
172.64.150.129 // images
192.229.220.133 // Videos
199.232.188.158 // Videos
172.66.0.0/24
Telegram
149.154.164.0/22
149.154.160.0/20
91.108.56.0/22
91.108.4.0/22
95.161.64.0/20
91.108.8.0/22
91.108.16.0/22
91.108.12.0/22
91.105.192.0/23
91.108.20.0/22
185.76.151.0/24
2001:b28:f23d::/48
2001:b28:f23f::/48
2001:67c:4e8::/48
2001:b28:f23c::/48
2a0a:f280::/32
static1.smartbear.co
108.157.214.96
108.157.214.92
108.157.214.73
108.157.214.40
18.165.140.117
18.165.140.75
18.165.140.71
18.165.140.36
cloudfront.net
52.85.49.123
52.85.49.113
52.85.49.35
52.85.49.12
## Kino.pub
94.237.43.28 - API
91.215.42.193 - web
95.129.233.136 - web
5.188.189.95 - web
172.67.218.67 - web
104.21.45.187 - web
54.37.134.16
57.128.212.243
5.199.173.130
5.199.173.153
5.199.173.163
185.42.163.120
57.128.212.242 (mail.kino.pub)
46.166.167.67 Vilnius, Lithuania
46.166.167.66 Vilnius, Lithuania
94.237.111.107 (94-237-111-107.nl-ams1.upcloud.host) North Holland, Netherlands
46.166.167.68 Vilnius, Lithuania
94.237.125.200 (atv.nl-ams1.upcloud.host) North Holland, Netherlands
94.237.43.28 (94-237-43-28.nl-ams1.upcloud.host) North Holland, Netherlands
94.237.42.247 (4dns) North Holland, Netherlands
94.237.41.236 (94-237-41-236.nl-ams1.upcloud.host) North Holland, Netherlands
91.215.42.193 Moscow, Russia
38.180.44.76 Harjumaa, Estonia
18.195.13.249 (ec2-18-195-13-249.eu-central-1.compute.amazonaws.com) Hesse, Germany
139.59.96.213 Singapore
194.67.111.89 (194-67-111-89.cloudvps.regruhosting.ru) Moscow, Russia
194.38.21.208 (rkn-fixer.network) Kyiv City, Ukraine
194.40.243.150 (rkn-fixer.network) Kyiv City, Ukraine
5.252.22.90 (nowarvpn.ru) Hesse, Germany
128.199.54.7 (emmet.io)
45.55.82.131 (livestyle.io)
172.67.195.29 (api.service-kp.com)
104.21.36.147 (api.service-kp.com)
172.66.40.229 cdn4t.store
172.66.43.27 cdn4t.store
172.67.222.159 cdn4t.store
104.21.46.23 cdn4t.store
104.26.13.72 cdn4t.store
104.26.12.72 cdn4t.store
172.67.70.167 cdn4t.store
## YouTube CDN (статика)
74.125.205.0/24
142.251.1.0/24
64.233.161.0/24
64.233.163.0/24
108.177.14.0/24
142.250.150.0/24
173.194.221.0/24
142.250.186.0/24
142.250.74.0/24
142.250.181.0/24
172.217.16.0/24
142.250.184.0/24
142.250.185.0/24
216.58.206.0/24
216.58.212.0/24
74.125.160.0/24
74.125.162.0/24
173.194.1.0/24
188.43.61.0/24
74.125.104.0/24
74.125.99.0/24
74.125.153.0/24
74.125.108.0/24
173.194.10.0/24
157.240.252.0/24
157.240.253.0/24
87.245.216.0/24
172.217.133.0/24
173.194.220.0/24
173.194.6.0/24
74.125.163.0/24
74.125.8.0/24
74.125.13.0/24
74.125.11.0/24
64.233.164.0/24
195.95.178.0/24
173.194.19.0/24
173.194.18.0/24
64.233.184.198
74.125.71.198
173.194.217.0/24
172.217.132.0/24
209.85.226.0/24
74.125.3.0/24
209.85.165.0/24
173.194.24.0/24
173.194.140.0/24
172.217.131.0/24
173.194.7.0/24
173.194.53.0/24
173.194.141.0/24
173.194.57.0/24
74.125.155.0/24
173.194.191.0/24
173.194.56.0/24
173.194.143.0/24
173.194.50.0/24
## hub.docker.com
52.44.227.212
54.156.140.159
44.221.37.199
## medium.com
162.159.152.4
162.159.153.4
## upwork.com
104.18.89.237
104.18.90.237
## socradar.io
188.114.99.229
188.114.99.224
188.114.98.229
188.114.98.224
172.67.74.159
104.26.11.38
104.26.10.38
## www.crowdstrike.com
104.16.180.118
104.16.181.118
# YouTube video cdn
173.194.181.0/24
173.194.176.0/24
74.125.154.0/24
89.113.122.0/24
188.234.138.0/24
188.234.140.0/24
173.194.179.0/24
74.125.162.0/24
173.194.188.0/24
74.125.173.0/24
74.125.153.0/24
74.125.110.0/24
173.194.177.0/24
173.194.180.0/24
173.194.10.0/24
173.194.151.0/24
173.194.178.0/24
173.194.182.0/24
173.194.163.0/24
173.194.2.0/24
173.194.187.0/24
64.233.162.0/24
74.125.131.0/24
74.125.111.0/24
74.125.100.0/24
173.194.73.0/24
108.177.15.0/24
74.125.172.0/24
74.125.156.0/24
173.194.164.0/24
173.194.189.0/24
173.194.160.0/24
// YouTube+
216.58.192.0/19
64.233.160.0/19
# Google Play (могут пересекаться с youtube cdn)
173.194.222.0/24
64.233.165.0/24
209.85.233.0/24
# RuTracker
172.67.182.196
104.21.32.39
104.21.50.150
172.67.163.237
# LostFilmTV
188.114.97.3
172.67.161.94
104.21.9.225
188.114.96.1
188.114.97.1
# Bosch Home Connect
3.120.63.228
18.198.108.65
3.125.230.2
18.185.28.63
18.192.139.211
18.194.52.28
20.33.66.163
# Discord
162.159.130.234
162.159.134.234
162.159.133.234
162.159.135.234
162.159.136.234
162.159.137.232
162.159.135.232
162.159.136.232
162.159.138.232
162.159.128.233
198.244.231.90
162.159.129.233
162.159.130.233
162.159.133.233
162.159.134.233
162.159.135.233
162.159.138.234
162.159.137.234
162.159.134.232
162.159.130.235
162.159.129.235
162.159.129.232
162.159.128.235
162.159.134.232
162.159.130.232
162.159.133.232
162.159.128.232
34.126.226.51
#Discord Голосовые сервера
e/24
64.233.165.94
35.207.188.57
35.207.81.249
35.207.171.222
195.62.89.0/24
66.22.192.0/18
66.22.196.0/24
66.22.197.0/24
66.22.198.0/24
66.22.199.0/24
66.22.216.0/24
66.22.217.0/24
66.22.237.0/24
66.22.238.0/24
66.22.241.0/24
66.22.242.0/24
66.22.244.0/24
64.71.8.96/29
34.0.240.0/24
34.0.241.0/24
34.0.242.0/24
34.0.243.0/24
34.0.244.0/24
34.0.245.0/24
34.0.246.0/24
34.0.247.0/24
34.0.248.0/24
34.0.249.0/24
34.0.250.0/24
34.0.251.0/24
12.129.184.160/29
138.128.136.0/21
162.158.0.0/15
172.64.0.0/13
34.0.0.0/15
34.2.0.0/15
35.192.0.0/12
35.208.0.0/12
5.200.14.128/25
66.22.192.0/18
// ChatGPT
162.159.140.0/24
172.64.150.0/24
104.18.37.0/24
104.18.35.28
104.18.41.241
172.64.152.228
172.64.146.15
188.114.98.0/24
188.114.99.0/24
172.64.155.209
104.18.39.85
172.64.148.171
172.64.155.214
104.18.32.0/24
8.6.112.0/24
8.47.69.0/24
// GitHub Copilot
140.82.121.6
140.82.121.5
140.82.114.22
140.82.114.21
140.82.113.22
140.82.113.21
140.82.112.22
140.82.112.21
20.250.119.64
20.199.39.224
4.225.11.192
// SmartTube
172.105.245.168
151.101.193.140
151.101.129.140
151.101.65.140
151.101.9.140
151.101.1.140
146.75.121.140
// Netflix (Рекомендую направлять через СНГ, там цеыны ниже. Например Казахстан)
54.155.178.5
54.74.73.31
3.251.50.149
54.246.79.9
52.214.181.141
54.170.196.176
54.155.246.232
18.200.8.190
54.73.148.110
104.44.0.0/16
108.174.0.0/16
144.2.0.0/16
185.63.140.0/22
13.107.0.0/16
40.74.0.0/15
40.76.0.0/14
52.183.0.0/16
52.224.0.0/16
104.18.0.0/16
142.250.0.0/16
172.217.0.0/16
172.64.0.0/16
74.125.0.0/16
45.42.64.0/24
45.42.66.0/24
103.20.92.0/24
# NoNaMe Club (nnmclub.to)
104.21.17.86
172.67.175.99
104.21.64.1
104.21.16.1
104.21.48.1
104.21.96.1
104.21.80.1
104.21.32.1
104.21.112.1
cub.red (Lampa)
172.67.207.253
117.55.203.183
104.21.69.116
5.61.53.100
NotePad++
92.113.23.0/24
92.113.16.0/24
91.108.123.0/24
77.37.55.0/24
91.108.98.0/24
# Все адреса в виде строк для файла загрузки
route ADD 173.194.187.0 MASK 255.255.255.0 0.0.0.0
route ADD 213.102.128.0 MASK 255.255.255.0 0.0.0.0
route ADD 204.15.20.0 MASK 255.255.252.0 0.0.0.0
route ADD 199.201.0.0 MASK 255.255.0.0 0.0.0.0
route ADD 185.89.0.0 MASK 255.255.0.0 0.0.0.0
route ADD 185.60.0.0 MASK 255.255.0.0 0.0.0.0
route ADD 179.60.0.0 MASK 255.255.0.0 0.0.0.0
route ADD 173.252.0.0 MASK 255.255.0.0 0.0.0.0
route ADD 164.163.191.64 MASK 255.255.255.192 0.0.0.0
route ADD 163.114.0.0 MASK 255.255.0.0 0.0.0.0
route ADD 163.77.128.0 MASK 255.255.128.0 0.0.0.0
route ADD 163.70.0.0 MASK 255.255.0.0 0.0.0.0
route ADD 157.240.0.0 MASK 255.255.0.0 0.0.0.0
route ADD 147.75.0.0 MASK 255.255.0.0 0.0.0.0
route ADD 142.250.0.0 MASK 255.254.0.0 0.0.0.0
route ADD 129.134.0.0 MASK 255.255.0.0 0.0.0.0
route ADD 103.4.0.0 MASK 255.255.0.0 0.0.0.0
route ADD 102.221.0.0 MASK 255.255.0.0 0.0.0.0
route ADD 102.132.0.0 MASK 255.255.0.0 0.0.0.0
route ADD 99.84.0.0 MASK 255.255.0.0 0.0.0.0
route ADD 87.245.208.0 MASK 255.255.255.0 0.0.0.0
route ADD 74.119.0.0 MASK 255.255.0.0 0.0.0.0
route ADD 69.171.0.0 MASK 255.255.0.0 0.0.0.0
route ADD 69.63.0.0 MASK 255.255.0.0 0.0.0.0
route ADD 66.220.0.0 MASK 255.255.0.0 0.0.0.0
route ADD 45.64.0.0 MASK 255.255.0.0 0.0.0.0
route ADD 31.13.0.0 MASK 255.255.0.0 0.0.0.0
route ADD 68.232.32.0 MASK 255.255.240.0 0.0.0.0
route ADD 199.232.0.0 MASK 255.255.0.0 0.0.0.0
route ADD 146.75.0.0 MASK 255.255.0.0 0.0.0.0
route ADD 151.101.0.0 MASK 255.255.0.0 0.0.0.0
route ADD 104.244.40.0 MASK 255.255.248.0 0.0.0.0
route ADD 34.64.0.0 MASK 255.192.0.0 0.0.0.0
route ADD 173.194.181.0 MASK 255.255.255.0 0.0.0.0
route ADD 173.194.176.0 MASK 255.255.255.0 0.0.0.0
route ADD 74.125.154.0 MASK 255.255.255.0 0.0.0.0
route ADD 89.113.122.0 MASK 255.255.255.0 0.0.0.0
route ADD 188.234.138.0 MASK 255.255.255.0 0.0.0.0
route ADD 188.234.140.0 MASK 255.255.255.0 0.0.0.0
route ADD 173.194.179.0 MASK 255.255.255.0 0.0.0.0
route ADD 74.125.162.0 MASK 255.255.255.0 0.0.0.0
route ADD 173.194.188.0 MASK 255.255.255.0 0.0.0.0
route ADD 74.125.173.0 MASK 255.255.255.0 0.0.0.0
route ADD 74.125.153.0 MASK 255.255.255.0 0.0.0.0
route ADD 74.125.110.0 MASK 255.255.255.0 0.0.0.0
route ADD 173.194.177.0 MASK 255.255.255.0 0.0.0.0
route ADD 173.194.180.0 MASK 255.255.255.0 0.0.0.0
route ADD 173.194.10.0 MASK 255.255.255.0 0.0.0.0
route ADD 173.194.151.0 MASK 255.255.255.0 0.0.0.0
route ADD 173.194.178.0 MASK 255.255.255.0 0.0.0.0
route ADD 173.194.182.0 MASK 255.255.255.0 0.0.0.0
route ADD 173.194.163.0 MASK 255.255.255.0 0.0.0.0
route ADD 173.194.2.0 MASK 255.255.255.0 0.0.0.0
route ADD 157.240.253.174 MASK 255.255.255.255 0.0.0.0
route ADD 157.240.253.172 MASK 255.255.255.255 0.0.0.0
route ADD 157.240.253.167 MASK 255.255.255.255 0.0.0.0
route ADD 157.240.253.63 MASK 255.255.255.255 0.0.0.0
route ADD 157.240.253.32 MASK 255.255.255.255 0.0.0.0
route ADD 157.240.252.174 MASK 255.255.255.255 0.0.0.0
route ADD 157.240.252.172 MASK 255.255.255.255 0.0.0.0
route ADD 157.240.252.167 MASK 255.255.255.255 0.0.0.0
route ADD 157.240.252.63 MASK 255.255.255.255 0.0.0.0
route ADD 157.240.252.38 MASK 255.255.255.255 0.0.0.0
route ADD 54.240.186.247 MASK 255.255.255.255 0.0.0.0
route ADD 54.192.98.249 MASK 255.255.255.255 0.0.0.0
route ADD 65.9.48.253 MASK 255.255.255.255 0.0.0.0
route ADD 18.165.126.254 MASK 255.255.255.255 0.0.0.0
route ADD 108.156.13.243 MASK 255.255.255.255 0.0.0.0
route ADD 13.33.247.243 MASK 255.255.255.255 0.0.0.0
route ADD 54.230.216.248 MASK 255.255.255.255 0.0.0.0
route ADD 199.59.243.223 MASK 255.255.255.255 0.0.0.0
route ADD 18.66.123.241 MASK 255.255.255.255 0.0.0.0
route ADD 18.66.95.249 MASK 255.255.255.255 0.0.0.0
route ADD 18.160.187.253 MASK 255.255.255.255 0.0.0.0
route ADD 13.225.15.250 MASK 255.255.255.255 0.0.0.0
route ADD 99.86.92.242 MASK 255.255.255.255 0.0.0.0
route ADD 13.225.33.247 MASK 255.255.255.255 0.0.0.0
route ADD 13.249.5.250 MASK 255.255.255.255 0.0.0.0
route ADD 108.157.229.247 MASK 255.255.255.255 0.0.0.0
route ADD 143.204.221.250 MASK 255.255.255.255 0.0.0.0
route ADD 152.199.21.141 MASK 255.255.255.255 0.0.0.0
route ADD 93.184.220.70 MASK 255.255.255.255 0.0.0.0
route ADD 192.229.233.50 MASK 255.255.255.255 0.0.0.0
route ADD 192.229.220.133 MASK 255.255.255.255 0.0.0.0
route ADD 108.157.214.96 MASK 255.255.255.255 0.0.0.0
route ADD 108.157.214.92 MASK 255.255.255.255 0.0.0.0
route ADD 108.157.214.73 MASK 255.255.255.255 0.0.0.0
route ADD 108.157.214.40 MASK 255.255.255.255 0.0.0.0
route ADD 18.165.140.117 MASK 255.255.255.255 0.0.0.0
route ADD 18.165.140.75 MASK 255.255.255.255 0.0.0.0
route ADD 18.165.140.71 MASK 255.255.255.255 0.0.0.0
route ADD 18.165.140.36 MASK 255.255.255.255 0.0.0.0
route ADD 52.85.49.123 MASK 255.255.255.255 0.0.0.0
route ADD 52.85.49.113 MASK 255.255.255.255 0.0.0.0
route ADD 52.85.49.35 MASK 255.255.255.255 0.0.0.0
route ADD 52.85.49.12 MASK 255.255.255.255 0.0.0.0
route ADD 52.44.227.212 MASK 255.255.255.255 0.0.0.0
route ADD 54.156.140.159 MASK 255.255.255.255 0.0.0.0
route ADD 44.221.37.199 MASK 255.255.255.255 0.0.0.0
route ADD 162.159.152.4 MASK 255.255.255.255 0.0.0.0
route ADD 162.159.153.4 MASK 255.255.255.255 0.0.0.0
route ADD 188.114.99.229 MASK 255.255.255.255 0.0.0.0
route ADD 188.114.99.224 MASK 255.255.255.255 0.0.0.0
route ADD 188.114.98.229 MASK 255.255.255.255 0.0.0.0
route ADD 188.114.98.224 MASK 255.255.255.255 0.0.0.0
route ADD 172.67.74.159 MASK 255.255.255.255 0.0.0.0
route ADD 104.26.11.38 MASK 255.255.255.255 0.0.0.0
route ADD 104.26.10.38 MASK 255.255.255.255 0.0.0.0
route ADD 173.194.222.0 MASK 255.255.255.0 0.0.0.0
route ADD 173.194.221.0 MASK 255.255.255.0 0.0.0.0
route ADD 64.233.165.0 MASK 255.255.255.0 0.0.0.0
route ADD 64.233.162.0 MASK 255.255.255.0 0.0.0.0
route ADD 142.250.186.0 MASK 255.255.255.0 0.0.0.0
route ADD 142.250.74.0 MASK 255.255.255.0 0.0.0.0
route ADD 142.250.181.0 MASK 255.255.255.0 0.0.0.0
route ADD 172.217.16.0 MASK 255.255.255.0 0.0.0.0
route ADD 142.250.184.0 MASK 255.255.255.0 0.0.0.0
route ADD 142.250.185.0 MASK 255.255.255.0 0.0.0.0
route ADD 216.58.206.0 MASK 255.255.255.0 0.0.0.0
route ADD 216.58.212.0 MASK 255.255.255.0 0.0.0.0
route ADD 74.125.205.0 MASK 255.255.255.0 0.0.0.0
route ADD 172.67.182.196 MASK 255.255.255.255 0.0.0.0
route ADD 104.21.32.39 MASK 255.255.255.255 0.0.0.0
route ADD 188.114.97.3 MASK 255.255.255.255 0.0.0.0
route ADD 172.67.161.94 MASK 255.255.255.255 0.0.0.0
route ADD 104.21.9.225 MASK 255.255.255.255 0.0.0.0
route ADD 3.120.63.228 MASK 255.255.255.255 0.0.0.0
route ADD 18.198.108.65 MASK 255.255.255.255 0.0.0.0
route ADD 3.125.230.2 MASK 255.255.255.255 0.0.0.0
route ADD 157.240.0.0 MASK 255.255.255.0 0.0.0.0
route ADD 157.240.251.0 MASK 255.255.255.0 0.0.0.0
route ADD 157.240.205.0 MASK 255.255.255.0 0.0.0.0
route ADD 173.194.10.0 MASK 255.255.255.0 0.0.0.0
route ADD 74.125.160.0 MASK 255.255.255.0 0.0.0.0
route ADD 74.125.162.0 MASK 255.255.255.0 0.0.0.0
route ADD 173.194.1.0 MASK 255.255.255.0 0.0.0.0
route ADD 188.43.61.0 MASK 255.255.255.0 0.0.0.0
route ADD 74.125.104.0 MASK 255.255.255.0 0.0.0.0
route ADD 74.125.99.0 MASK 255.255.255.0 0.0.0.0
route ADD 74.125.153.0 MASK 255.255.255.0 0.0.0.0
route ADD 74.125.108.0 MASK 255.255.255.0 0.0.0.0
route ADD 173.194.10.0 MASK 255.255.255.0 0.0.0.0
route ADD 157.240.252.0 MASK 255.255.255.0 0.0.0.0
route ADD 157.240.253.0 MASK 255.255.255.0 0.0.0.0
route ADD 87.245.216.0 MASK 255.255.255.0 0.0.0.0
route ADD 172.217.133.0 MASK 255.255.255.0 0.0.0.0
route ADD 173.194.220.0 MASK 255.255.255.0 0.0.0.0
route ADD 74.125.131.0 MASK 255.255.255.0 0.0.0.0
route ADD 209.85.233.0 MASK 255.255.255.0 0.0.0.0
route ADD 173.194.6.0 MASK 255.255.255.0 0.0.0.0
route ADD 74.125.163.0 MASK 255.255.255.0 0.0.0.0
route ADD 74.125.8.0 MASK 255.255.255.0 0.0.0.0
route ADD 74.125.111.0 MASK 255.255.255.0 0.0.0.0
route ADD 74.125.13.0 MASK 255.255.255.0 0.0.0.0
route ADD 74.125.100.0 MASK 255.255.255.0 0.0.0.0
route ADD 74.125.11.0 MASK 255.255.255.0 0.0.0.0
route ADD 64.233.161.0 MASK 255.255.255.0 0.0.0.0
route ADD 64.233.164.0 MASK 255.255.255.0 0.0.0.0
route ADD 173.194.73.0 MASK 255.255.255.0 0.0.0.0
route ADD 108.177.14.0 MASK 255.255.255.0 0.0.0.0
route ADD 64.233.163.0 MASK 255.255.255.0 0.0.0.0
route ADD 142.251.1.0 MASK 255.255.255.0 0.0.0.0
route ADD 142.250.150.0 MASK 255.255.255.0 0.0.0.0
route ADD 162.159.130.234 MASK 255.255.255.255 0.0.0.0
route ADD 162.159.134.234 MASK 255.255.255.255 0.0.0.0
route ADD 162.159.133.234 MASK 255.255.255.255 0.0.0.0
route ADD 162.159.135.234 MASK 255.255.255.255 0.0.0.0
route ADD 162.159.136.234 MASK 255.255.255.255 0.0.0.0
route ADD 162.159.137.232 MASK 255.255.255.255 0.0.0.0
route ADD 162.159.135.232 MASK 255.255.255.255 0.0.0.0
route ADD 162.159.136.232 MASK 255.255.255.255 0.0.0.0
route ADD 162.159.138.232 MASK 255.255.255.255 0.0.0.0
route ADD 162.159.128.233 MASK 255.255.255.255 0.0.0.0
route ADD 198.244.231.90 MASK 255.255.255.255 0.0.0.0
route ADD 5.188.189.95 MASK 255.255.255.255 0.0.0.0
route ADD 162.159.129.233 MASK 255.255.255.255 0.0.0.0
route ADD 162.159.130.233 MASK 255.255.255.255 0.0.0.0
route ADD 162.159.133.233 MASK 255.255.255.255 0.0.0.0
route ADD 162.159.134.233 MASK 255.255.255.255 0.0.0.0
route ADD 162.159.135.233 MASK 255.255.255.255 0.0.0.0
route ADD 162.159.138.234 MASK 255.255.255.255 0.0.0.0
route ADD 162.159.137.234 MASK 255.255.255.255 0.0.0.0
route ADD 162.159.134.232 MASK 255.255.255.255 0.0.0.0
route ADD 162.159.130.235 MASK 255.255.255.255 0.0.0.0
route ADD 162.159.129.235 MASK 255.255.255.255 0.0.0.0
route ADD 162.159.129.232 MASK 255.255.255.255 0.0.0.0
route ADD 162.159.128.235 MASK 255.255.255.255 0.0.0.0
route ADD 64.233.165.94 MASK 255.255.255.255 0.0.0.0
route ADD 35.207.188.57 MASK 255.255.255.255 0.0.0.0
route ADD 35.207.81.249 MASK 255.255.255.255 0.0.0.0
route ADD 35.207.171.222 MASK 255.255.255.255 0.0.0.0
route ADD 66.22.243.0 MASK 255.255.255.0 0.0.0.0
route ADD 54.37.134.16 MASK 255.255.255.255 0.0.0.0
route ADD 57.128.212.243 MASK 255.255.255.255 0.0.0.0
route ADD 5.199.173.130 MASK 255.255.255.255 0.0.0.0
route ADD 5.199.173.153 MASK 255.255.255.255 0.0.0.0
route ADD 5.199.173.163 MASK 255.255.255.255 0.0.0.0
route ADD 185.42.163.120 MASK 255.255.255.255 0.0.0.0
route ADD 57.128.212.242 MASK 255.255.255.255 0.0.0.0
route ADD 46.166.167.67 MASK 255.255.255.255 0.0.0.0
route ADD 46.166.167.66 MASK 255.255.255.255 0.0.0.0
route ADD 94.237.111.107 MASK 255.255.255.255 0.0.0.0
route ADD 46.166.167.68 MASK 255.255.255.255 0.0.0.0
route ADD 94.237.125.200 MASK 255.255.255.255 0.0.0.0
route ADD 94.237.43.28 MASK 255.255.255.255 0.0.0.0
route ADD 94.237.42.247 MASK 255.255.255.255 0.0.0.0
route ADD 94.237.41.236 MASK 255.255.255.255 0.0.0.0
route ADD 91.215.42.193 MASK 255.255.255.255 0.0.0.0
route ADD 38.180.44.76 MASK 255.255.255.255 0.0.0.0
route ADD 18.195.13.249 MASK 255.255.255.255 0.0.0.0
route ADD 139.59.96.213 MASK 255.255.255.255 0.0.0.0
route ADD 194.67.111.89 MASK 255.255.255.255 0.0.0.0
route ADD 194.38.21.208 MASK 255.255.255.255 0.0.0.0
route ADD 194.40.243.150 MASK 255.255.255.255 0.0.0.0
route ADD 5.252.22.90 MASK 255.255.255.255 0.0.0.0
route ADD 128.199.54.7 MASK 255.255.255.255 0.0.0.0
route ADD 45.55.82.131 MASK 255.255.255.255 0.0.0.0
route ADD 162.159.134.232 MASK 255.255.255.255 0.0.0.0
route ADD 162.159.130.232 MASK 255.255.255.255 0.0.0.0
route ADD 162.159.133.232 MASK 255.255.255.255 0.0.0.0
route ADD 162.159.128.232 MASK 255.255.255.255 0.0.0.0
route ADD 195.95.178.0 MASK 255.255.255.0 0.0.0.0
route ADD 104.18.37.127 MASK 255.255.255.255 0.0.0.0
route ADD 172.64.150.129 MASK 255.255.255.255 0.0.0.0
route ADD 173.194.19.0 MASK 255.255.255.0 0.0.0.0
route ADD 64.233.184.198 MASK 255.255.255.255 0.0.0.0
route ADD 173.194.18.0 MASK 255.255.255.0 0.0.0.0
route ADD 77.240.43.0 MASK 255.255.255.0 0.0.0.0
route ADD 57.144.112.34 MASK 255.255.255.255 0.0.0.0
route ADD 57.144.110.1 MASK 255.255.255.255 0.0.0.0
route ADD 157.240.205.174 MASK 255.255.255.255 0.0.0.0
route ADD 216.58.192.0 MASK 255.255.224.0 0.0.0.0
route ADD 64.233.160.0 MASK 255.255.224.0 0.0.0.0
route ADD 172.105.245.168 MASK 255.255.255.255 0.0.0.0
route ADD 162.159.140.0 MASK 255.255.255.0 0.0.0.0
route ADD 172.64.150.0 MASK 255.255.255.0 0.0.0.0
route ADD 104.18.37.0 MASK 255.255.255.0 0.0.0.0
route ADD 104.18.35.28 MASK 255.255.255.255 0.0.0.0
route ADD 172.64.152.228 MASK 255.255.255.255 0.0.0.0
route ADD 104.18.41.241 MASK 255.255.255.255 0.0.0.0
route ADD 172.64.146.15 MASK 255.255.255.255 0.0.0.0
route ADD 188.114.98.0 MASK 255.255.255.0 0.0.0.0
route ADD 188.114.99.0 MASK 255.255.255.0 0.0.0.0
route ADD 95.129.233.136 MASK 255.255.255.255 0.0.0.0
route ADD 173.194.217.0 MASK 255.255.255.0 0.0.0.0
route ADD 74.125.71.198 MASK 255.255.255.255 0.0.0.0
route ADD 199.232.188.158 MASK 255.255.255.255 0.0.0.0
route ADD 104.21.50.150 MASK 255.255.255.255 0.0.0.0
route ADD 172.67.163.237 MASK 255.255.255.255 0.0.0.0
route ADD 188.114.96.1 MASK 255.255.255.255 0.0.0.0
route ADD 188.114.97.1 MASK 255.255.255.255 0.0.0.0
route ADD 104.244.42.0 MASK 255.255.255.0 0.0.0.0
route ADD 172.67.218.67 MASK 255.255.255.255 0.0.0.0
route ADD 104.21.45.187 MASK 255.255.255.255 0.0.0.0
route ADD 140.82.121.6 MASK 255.255.255.255 0.0.0.0
route ADD 140.82.121.5 MASK 255.255.255.255 0.0.0.0
route ADD 140.82.114.22 MASK 255.255.255.255 0.0.0.0
route ADD 140.82.114.21 MASK 255.255.255.255 0.0.0.0
route ADD 140.82.113.22 MASK 255.255.255.255 0.0.0.0
route ADD 140.82.113.21 MASK 255.255.255.255 0.0.0.0
route ADD 140.82.112.22 MASK 255.255.255.255 0.0.0.0
route ADD 140.82.112.21 MASK 255.255.255.255 0.0.0.0
route ADD 20.250.119.64 MASK 255.255.255.255 0.0.0.0
route ADD 20.199.39.224 MASK 255.255.255.255 0.0.0.0
route ADD 4.225.11.192 MASK 255.255.255.255 0.0.0.0
route ADD 104.16.180.118 MASK 255.255.255.255 0.0.0.0
route ADD 104.16.181.118 MASK 255.255.255.255 0.0.0.0
route ADD 172.64.155.209 MASK 255.255.255.255 0.0.0.0
route ADD 104.18.89.237 MASK 255.255.255.255 0.0.0.0
route ADD 104.18.90.237 MASK 255.255.255.255 0.0.0.0
route ADD 18.185.28.63 MASK 255.255.255.255 0.0.0.0
route ADD 18.192.139.211 MASK 255.255.255.255 0.0.0.0
route ADD 18.194.52.28 MASK 255.255.255.255 0.0.0.0
route ADD 20.33.66.163 MASK 255.255.255.255 0.0.0.0
route ADD 34.126.226.51 MASK 255.255.255.255 0.0.0.0
route ADD 104.18.39.85 MASK 255.255.255.255 0.0.0.0
route ADD 108.177.15.0 MASK 255.255.255.0 0.0.0.0
route ADD 172.64.148.171 MASK 255.255.255.255 0.0.0.0
route ADD 172.64.155.214 MASK 255.255.255.255 0.0.0.0
route ADD 104.18.32.0 MASK 255.255.255.0 0.0.0.0
route ADD 172.217.132.0 MASK 255.255.255.0 0.0.0.0
route ADD 209.85.226.0 MASK 255.255.255.0 0.0.0.0
route ADD 195.62.89.0 MASK 255.255.255.0 0.0.0.0
route ADD 66.22.192.0 MASK 255.255.192.0 0.0.0.0
route ADD 66.22.196.0 MASK 255.255.255.0 0.0.0.0
route ADD 66.22.197.0 MASK 255.255.255.0 0.0.0.0
route ADD 66.22.198.0 MASK 255.255.255.0 0.0.0.0
route ADD 66.22.199.0 MASK 255.255.255.0 0.0.0.0
route ADD 66.22.216.0 MASK 255.255.255.0 0.0.0.0
route ADD 66.22.217.0 MASK 255.255.255.0 0.0.0.0
route ADD 66.22.237.0 MASK 255.255.255.0 0.0.0.0
route ADD 66.22.238.0 MASK 255.255.255.0 0.0.0.0
route ADD 66.22.241.0 MASK 255.255.255.0 0.0.0.0
route ADD 66.22.242.0 MASK 255.255.255.0 0.0.0.0
route ADD 66.22.244.0 MASK 255.255.255.0 0.0.0.0
route ADD 64.71.8.96 MASK 255.255.255.248 0.0.0.0
route ADD 34.0.240.0 MASK 255.255.255.0 0.0.0.0
route ADD 34.0.241.0 MASK 255.255.255.0 0.0.0.0
route ADD 34.0.242.0 MASK 255.255.255.0 0.0.0.0
route ADD 34.0.243.0 MASK 255.255.255.0 0.0.0.0
route ADD 34.0.244.0 MASK 255.255.255.0 0.0.0.0
route ADD 34.0.245.0 MASK 255.255.255.0 0.0.0.0
route ADD 34.0.246.0 MASK 255.255.255.0 0.0.0.0
route ADD 34.0.247.0 MASK 255.255.255.0 0.0.0.0
route ADD 34.0.248.0 MASK 255.255.255.0 0.0.0.0
route ADD 34.0.249.0 MASK 255.255.255.0 0.0.0.0
route ADD 34.0.250.0 MASK 255.255.255.0 0.0.0.0
route ADD 34.0.251.0 MASK 255.255.255.0 0.0.0.0
route ADD 12.129.184.160 MASK 255.255.255.248 0.0.0.0
route ADD 195.62.89.0 MASK 255.255.255.0 0.0.0.0
route ADD 172.67.195.29 MASK 255.255.255.255 0.0.0.0
route ADD 104.21.36.147 MASK 255.255.255.255 0.0.0.0
route ADD 151.101.193.140 MASK 255.255.255.255 0.0.0.0
route ADD 151.101.129.140 MASK 255.255.255.255 0.0.0.0
route ADD 151.101.65.140 MASK 255.255.255.255 0.0.0.0
route ADD 151.101.9.140 MASK 255.255.255.255 0.0.0.0
route ADD 151.101.1.140 MASK 255.255.255.255 0.0.0.0
route ADD 146.75.121.140 MASK 255.255.255.255 0.0.0.0
route ADD 54.155.178.5 MASK 255.255.255.255 0.0.0.0
route ADD 54.74.73.31 MASK 255.255.255.255 0.0.0.0
route ADD 3.251.50.149 MASK 255.255.255.255 0.0.0.0
route ADD 54.246.79.9 MASK 255.255.255.255 0.0.0.0
route ADD 52.214.181.141 MASK 255.255.255.255 0.0.0.0
route ADD 54.170.196.176 MASK 255.255.255.255 0.0.0.0
route ADD 54.155.246.232 MASK 255.255.255.255 0.0.0.0
route ADD 18.200.8.190 MASK 255.255.255.255 0.0.0.0
route ADD 54.73.148.110 MASK 255.255.255.255 0.0.0.0
route ADD 74.125.172.0 MASK 255.255.255.0 0.0.0.0
route ADD 74.125.156.0 MASK 255.255.255.0 0.0.0.0
route ADD 74.125.3.0 MASK 255.255.255.0 0.0.0.0
route ADD 209.85.165.0 MASK 255.255.255.0 0.0.0.0
route ADD 173.194.24.0 MASK 255.255.255.0 0.0.0.0
route ADD 173.194.140.0 MASK 255.255.255.0 0.0.0.0
route ADD 172.217.131.0 MASK 255.255.255.0 0.0.0.0
route ADD 173.194.7.0 MASK 255.255.255.0 0.0.0.0
route ADD 173.194.53.0 MASK 255.255.255.0 0.0.0.0
route ADD 173.194.141.0 MASK 255.255.255.0 0.0.0.0
route ADD 173.194.57.0 MASK 255.255.255.0 0.0.0.0
route ADD 74.125.155.0 MASK 255.255.255.0 0.0.0.0
route ADD 173.194.191.0 MASK 255.255.255.0 0.0.0.0
route ADD 173.194.56.0 MASK 255.255.255.0 0.0.0.0
route ADD 173.194.143.0 MASK 255.255.255.0 0.0.0.0
route ADD 57.144.222.0 MASK 255.255.255.0 0.0.0.0
route ADD 45.130.4.0 MASK 255.255.255.0 0.0.0.0
route ADD 87.245.223.97 MASK 255.255.255.255 0.0.0.0
route ADD 57.144.96.0 MASK 255.255.254.0 0.0.0.0
ROUTE ADD 104.44.0.0 MASK 255.255.0.0 0.0.0.0
ROUTE ADD 108.174.0.0 MASK 255.255.0.0 0.0.0.0
ROUTE ADD 144.2.0.0 MASK 255.255.0.0 0.0.0.0
ROUTE ADD 185.63.140.0 MASK 255.255.252.0 0.0.0.0
ROUTE ADD 13.107.0.0 MASK 255.255.0.0 0.0.0.0
ROUTE ADD 40.74.0.0 MASK 255.254.0.0 0.0.0.0
ROUTE ADD 40.76.0.0 MASK 255.252.0.0 0.0.0.0
ROUTE ADD 52.183.0.0 MASK 255.255.0.0 0.0.0.0
ROUTE ADD 52.224.0.0 MASK 255.255.0.0 0.0.0.0
ROUTE ADD 104.18.0.0 MASK 255.255.0.0 0.0.0.0
ROUTE ADD 142.250.0.0 MASK 255.255.0.0 0.0.0.0
ROUTE ADD 172.217.0.0 MASK 255.255.0.0 0.0.0.0
ROUTE ADD 172.64.0.0 MASK 255.255.0.0 0.0.0.0
ROUTE ADD 74.125.0.0 MASK 255.255.0.0 0.0.0.0
ROUTE ADD 45.42.64.0 MASK 255.255.255.0 0.0.0.0
ROUTE ADD 45.42.66.0 MASK 255.255.255.0 0.0.0.0
ROUTE ADD 103.20.92.0 MASK 255.255.255.0 0.0.0.0
ROUTE ADD 8.6.112.0 MASK 255.255.255.0 0.0.0.0
ROUTE ADD 8.47.69.0 MASK 255.255.255.0 0.0.0.0
ROUTE ADD 172.66.0.0 MASK 255.255.255.0 0.0.0.0
ROUTE ADD 138.128.136.0 MASK 255.255.248.0 0.0.0.0
ROUTE ADD 162.158.0.0 MASK 255.254.0.0 0.0.0.0
ROUTE ADD 172.64.0.0 MASK 255.248.0.0 0.0.0.0
ROUTE ADD 34.0.0.0 MASK 255.254.0.0 0.0.0.0
ROUTE ADD 34.2.0.0 MASK 255.254.0.0 0.0.0.0
ROUTE ADD 35.192.0.0 MASK 255.240.0.0 0.0.0.0
ROUTE ADD 35.208.0.0 MASK 255.240.0.0 0.0.0.0
ROUTE ADD 5.200.14.128 MASK 255.255.255.128 0.0.0.0
ROUTE ADD 66.22.192.0 MASK 255.255.192.0 0.0.0.0
ROUTE ADD 173.194.50.0 MASK 255.255.255.0 0.0.0.0
ROUTE ADD 104.21.17.86 MASK 255.255.255.255 0.0.0.0
ROUTE ADD 172.67.175.99 MASK 255.255.255.255 0.0.0.0
ROUTE ADD 104.21.64.1 MASK 255.255.255.255 0.0.0.0
ROUTE ADD 104.21.16.1 MASK 255.255.255.255 0.0.0.0
ROUTE ADD 104.21.48.1 MASK 255.255.255.255 0.0.0.0
ROUTE ADD 104.21.96.1 MASK 255.255.255.255 0.0.0.0
ROUTE ADD 104.21.80.1 MASK 255.255.255.255 0.0.0.0
ROUTE ADD 104.21.32.1 MASK 255.255.255.255 0.0.0.0
ROUTE ADD 104.21.112.1 MASK 255.255.255.255 0.0.0.0
ROUTE ADD 173.194.164.0 MASK 255.255.255.0 0.0.0.0
ROUTE ADD 173.194.189.0 MASK 255.255.255.0 0.0.0.0
ROUTE ADD 172.67.207.253 MASK 255.255.255.255 0.0.0.0
ROUTE ADD 117.55.203.183 MASK 255.255.255.255 0.0.0.0
ROUTE ADD 104.21.69.116 MASK 255.255.255.255 0.0.0.0
ROUTE ADD 5.61.53.100 MASK 255.255.255.255 0.0.0.0
ROUTE ADD 57.144.244.0 MASK 255.255.255.0 0.0.0.0
ROUTE ADD 172.66.40.229 MASK 255.255.255.255 0.0.0.0
ROUTE ADD 172.66.43.27 MASK 255.255.255.255 0.0.0.0
ROUTE ADD 172.67.222.159 MASK 255.255.255.255 0.0.0.0
ROUTE ADD 104.21.46.23 MASK 255.255.255.255 0.0.0.0
ROUTE ADD 104.26.13.72 MASK 255.255.255.255 0.0.0.0
ROUTE ADD 104.26.12.72 MASK 255.255.255.255 0.0.0.0
ROUTE ADD 172.67.70.167 MASK 255.255.255.255 0.0.0.0
ROUTE ADD 92.113.23.0 MASK 255.255.255.0 0.0.0.0
ROUTE ADD 92.113.16.0 MASK 255.255.255.0 0.0.0.0
ROUTE ADD 91.108.123.0 MASK 255.255.255.0 0.0.0.0
ROUTE ADD 77.37.55.0 MASK 255.255.255.0 0.0.0.0
ROUTE ADD 91.108.98.0 MASK 255.255.255.0 0.0.0.0
ROUTE ADD 173.194.160.0 MASK 255.255.255.255 0.0.0.0
ROUTE ADD 157.240.201.0 MASK 255.255.255.255 0.0.0.0
ROUTE ADD 31.13.72.0 MASK 255.255.255.255 0.0.0.0
ROUTE ADD 57.144.248.0 MASK 255.255.255.255 0.0.0.0