Создать пользователя в AD (Например – usr1cv8x с сложным паролем, но потребуется он только при настройке – strongpassword)
Ввести Linux сервер в Домен штатными средствами
Выполнить на Windows сервере ktpass -princ usr1cv8/1csrvhostname.domain.name@DOMAIN.NAME -mapuser usr1cv8x -pass strongpassword -out usr1cv8.keytab Это создаст файл и пропишет user logon name
Чтобы не пересылать keytab файл проще его генерировать сразу на Linux сервере (обязательно -e RC4-HMAC), для этого ktutil addent -password -p usr1cv8/1csrvhostname.domain.name@DOMAIN.NAME -k 6 -e RC4-HMAC Ввести пароль от учетной записи usr1cv8x wkt /opt/1cv8/x86_64/8.3.22.2239/usr1cv8.keytab q
По дефолту 1с ищет usr1cv8.keytab в корневой папке конкретной версии, При желании файл можно разместить в любом другом месте, нужно только изменить переменную SRV1CV8_KEYTAB.
Назначить права на созданный файл chown usr1cv8:grp1cv8 /opt/1cv8/x86_64/8.3.22.2239/usr1cv8.keytab chmod 600 /opt/1cv8/x86_64/8.3.22.2239/usr1cv8.keytab
Следующие проверочные комманды не должны выдать ошибки klist -e -k -t /opt/1cv8/x86_64/8.3.22.2239/usr1cv8.keytab kinit -k -t /opt/1cv8/x86_64/8.3.22.2239/usr1cv8.keytab usr1cv8/1csrvhostname.domain.name@DOMAIN.NAME
Если сходу не заработало включаем логирование 1с сервера:
Для настройки сбора логов необходимо выполнить следующие действия:
1. Перейдите в пользователя root.su –
2. Создайте папку для логов.mkdir -p /var/log/log1c
В свойствах пользователя выбрать «Аутентификация операционной системы» и в поле «Пользователь» прописать \\DOMAIN.NAME\e.ivanov
Ошибки:
1c GSS-API error gss_acquire_cred: No credentials were supplied, or the credentials were unavailable; No key table entry found matching usr1cv8/1cl02@ – Не правильно прописан файл etc hosts
KDC reply did not match expectations while getting initial credentials – Домен должен быть прописан в верхнем регистре
This credit will be applied to any valid services used during your first 60 days.Sign Up
Keeping your system up-to-date with the latest packages and security updates can be a tedious task. Most users forget to do it, leaving them vulnerable to countless threats. Automate security (and other package) updates with the utility Unattended Upgrades on Debian.
Log into your Linode via SSH and update and upgrade.sudo apt update && sudo apt upgrade
Note
This guide is written for a non-root user. Commands that require elevated privileges are prefixed with sudo. If you’re not familiar with the sudo command, see our Users and Groups guide.
You can set up automated security updates on Debian by installing a helpful utility called unattended-upgrades.
Install it running the following command:sudo apt install unattended-upgrades
After the installation completes, you can enable and start the unattended-upgrades service by running the following commands: sudo systemctl enable unattended-upgrades sudo systemctl start unattended-upgrades This ensures that the service runs on system startup and is persistent throughout.
You now need to make changes to the configuration file. The default configuration file can be found here at /etc/apt/apt.conf.d/50unattended-upgrades. Open it with the text editor of your choice.
Note
The unattended-upgrades package ignores lines that start with //, as that line is considered to be a comment. Therefore, if you want a repository to update automatically, you need to remove // from that line.
In our example, remove // from the “security” line if it’s there, "origin=Debian,codename=${distro_codename},label=Debian-Security";. This section should look like the following:
...

Unattended-Upgrade::Origins-Pattern {
        // Codename based matching:
        // This will follow the migration of a release through different
        // archives (e.g. from testing to stable and later oldstable).
        // Software will be the latest available for the named release,
        // but the Debian release itself will not be automatically upgraded.
//      "origin=Debian,codename=${distro_codename}-updates";
//      "origin=Debian,codename=${distro_codename}-proposed-updates";
        "origin=Debian,codename=${distro_codename},label=Debian";
        "origin=Debian,codename=${distro_codename},label=Debian-Security";

        // Archive or Suite based matching:
        // Note that this will silently match a different release after
        // migration to the specified archive (e.g. testing becomes the
        // new stable).
//      "o=Debian,a=stable";
//      "o=Debian,a=stable-updates";
//      "o=Debian,a=proposed-updates";
//      "o=Debian Backports,a=${distro_codename}-backports,l=Debian Backports";
};

...
Вы можете использовать PowerShell модуль PSWindowsUpdate для управления обновлениями Windows из командной строки. Модуль PSWindowsUpdate не встроен в Windows и доступен для установки из репозитория PowerShell Gallery. PSWindowsUpdate позволяет администраторам удаленно проверять, устанавливать, удалять и скрывать обновления на рабочих станциях и серверах Windows. Модуль PSWindowsUpdate особо ценен при использовании для управления обновлениями в Core редакциях Windows Server (в которых отсутствуют графический интерфейс), а также при настройке образа Windows в режиме аудита.
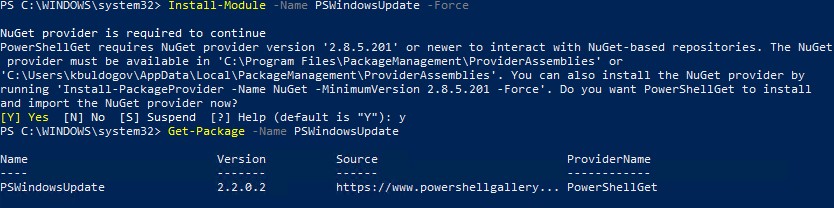
Установка модуля управления обновлениями PSWindowsUpdate
Если вы используете Windows 10/11 или Windows Server 2022/2019/2016, вы можете установить (обновить) модуль PSWindowsUpdate из онлайн репозитория через менеджер пакетов PackageManagement всего одной командой:
Install-Module -Name PSWindowsUpdate
После окончания установки нужно проверить наличие пакета:
Get-Package -Name PSWindowsUpdate
В старых версиях Windows 2012R2/Windows 8.1 и ниже при установке PowerShell модуля может появится ошибка:
Для установки модуля нужно использовать для подключения протокол TLS 1.2. Включите его: [Net.ServicePointManager]::SecurityProtocol = [Net.SecurityProtocolType]::Tls12
Если у вас установлена более старая версия Windows (Windows 7/8.1/ Windows Server 2008 R2/ 2012 R2) или отсутствует прямой доступ в Интернет, вы можете установить модуль PSWindowsUpdate вручную (см. полную инструкцию по офлайн установке модулей PowerShell).
Скачайте модуль PSWindowsUpdate на любой онлайн компьютер: Save-Module –Name PSWindowsUpdate –Path C:\ps\ ;
Скопируйте модуль на целевой компьютер, и поместите его в каталог %WINDIR%\System32\WindowsPowerShell\v1.0\Modules (при постоянном использовании модуля это лучший вариант);
Теперь вы можете импортировать модуль в свою сессию PowerShell: Import-Module PSWindowsUpdate
Примечание. В Windows 7 / Server 2008 R2 при импорте модуля PSWindowsUpdate вы можете столкнутся с ошибкой вида: Имя "Unblock-File" не распознано как имя командлета . Дело в том, что в модуле используются некоторые функции, которые появились только в PowerShell 3.0. Для использования этих функций вам придется обновить PowerShell, либо вручную удалить строку | Unblock-File из файла PSWindowsUpdate.psm1.
После установки модуля PSWindowsUpdate на своем компьютере вы можете удаленно установить его на другие компьютеры или сервера с помощью командлета Update-WUModule. Например, чтобы скопировать PSWindowsUpdate модуль с вашего компьютера на два удаленных сервера, выполните команды (нужен доступ к удаленным серверам по протоколу WinRM):
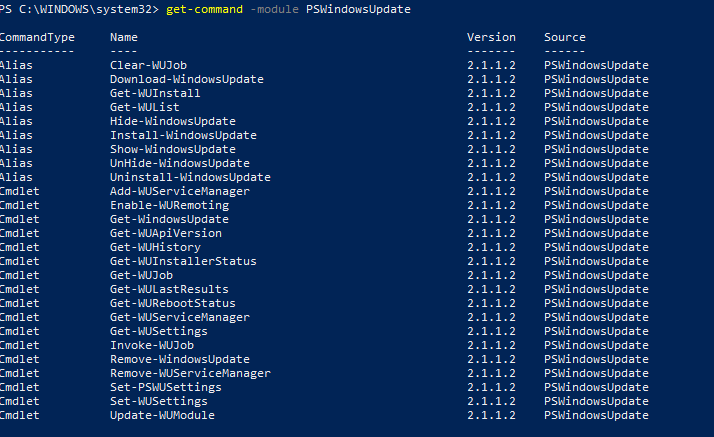
Get-WindowsUpdate (Get-WUList) — выводит список обновлений, соответствующим указанным критериям, позволяет найти и установить нужное обновление. Это основной командлет модуля PSWindowsUpdate. Позволяет скачать и установить обновления с сервера WSUS или Microsoft Update. Позволяет выбрать категории обновлений, конкретные обновления и указать правила перезагрузки компьютера при установке обновлений;
Get-WUApiVersion – получить версию агента Windows Update Agent на компьютере;
Get-WUHistory – вывести список установленных обновлений (история обновлений);
Get-WUInstallerStatus — проверка состояния службы Windows Installer;
Get-WUJob – запуска заданий обновления WUJob в Task Scheduler;
Get-WULastResults — даты последнего поиска и установки обновлений (LastSearchSuccessDate и LastInstallationSuccessDate);
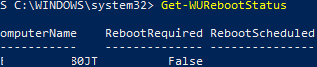
Get-WURebootStatus — позволяет проверить, нужна ли перезагрузка для применения конкретного обновления;
Get-WUServiceManager – вывод источников обновлений;
Get-WUSettings – получить настройки клиента Windows Update;
Invoke-WUJob – удаленное вызов заданий WUJobs в Task Schduler для немедленного выполнения заданий PSWindowsUpdate.
Remove-WindowsUpdate – удалить обновление;
Remove-WUServiceManager – отключить Windows Update Service Manager;
Set-PSWUSettings – сохранить настройки модуля PSWindowsUpdate в XML файл;
Set-WUSettings – настройка параметров клиента Windows Update;
Update-WUModule – обновить модуль PSWindowsUpdate (можно обновить модуль на удаленном компьютере, скопировав его с текущего, или обновить из PSGallery);
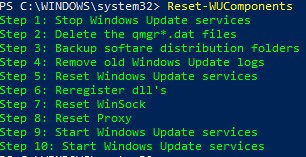
Reset-WUComponents – позволяет сбросить настройка агента Windows Update на компьютере к настройкам по-умолчанию.
Чтобы проверить текущие настройки клиента Windows Update, выполните команду:
Управление обновлениями Windows на удаленных компьютерах через PowerShell
Практически все командлеты модуля PSWindowsUpdate позволяют управлять установкой обновлений на удаленных компьютерах. Для этого используется атрибут -Computername Host1, Host2, Host3 . На удаленных компьютерах должен быть включен и настроен WinRM (вручную или через GPO).
Установите модуль PSWindowsUpdate на удаленных компьютерах и разрешите в файерволе доступ по динамическим RPC портам к процессу dllhost.exe. Можно использовать Invoke-Command для настройки модуля PSWindowsUpdate на удаленных компьютерах:
winrm set winrm/config/client ‘@{TrustedHosts="HOST1,HOST2,…"}’
Или с помощью PowerShell: Set-Item wsman:\localhost\client\TrustedHosts -Value wsk-w10BO1 -Force
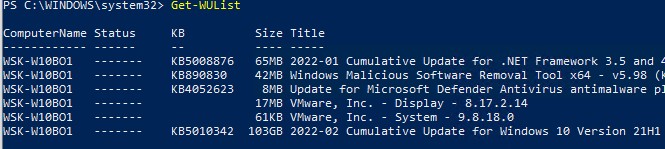
Получить список доступных обновлений Windows из PowerShell
Вывести список обновлений, доступных для данного компьютера на сервере обновлений можно с помощью команд Get-WindowsUpdate или Get-WUList.
Чтобы проверить список доступных обновлений на удаленном компьютере, выполните:
Get-WUList –ComputerName server2
Вы можете проверить, откуда должна получать обновления ваша ОС Windows. Выполните команду:
Get-WUServiceManager
ServiceID IsManaged IsDefault Name
--------- --------- --------- ----
8b24b027-1dee-babb-9a95-3517dfb9c552 False False DCat Flighting Prod
855e8a7c-ecb4-4ca3-b045-1dfa50104289 False False Windows Store (DCat Prod)
3da21691-e39d-4da6-8a4b-b43877bcb1b7 True True Windows Server Update Service
9482f4b4-e343-43b6-b170-9a65bc822c77 False False Windows Update
Как вы видите, компьютер настроен на получение обновлений с локального сервера WSUS (Windows Server Update Service = True). В этом случае вы должны увидеть список обновлений, одобренных для вашего компьютера на WSUS.
Если вы хотите просканировать ваш компьютер на серверах Microsoft Update (кроме обновлений Windows на этих серверах содержатся обновления Office и других продуктов) в Интернете, выполните команду:
Get-WUlist -MicrosoftUpdate
Вы получаете предупреждение:
Get-WUlist : Service Windows Update was not found on computer
Чтобы разрешить сканирование на Microsoft Update, выполните команду:
Теперь можете выполнить сканирование на Microsoft Update. Как вы видите, в данном случае были найдены дополнительные обновления для Microsoft Visual C++ 2008 и Microsoft Silverlight.
Чтобы проверить версию агента Windows Update на компьютере, выполните команду:
Установка обновлений Windows с помощью Install-WindowsUpdate
Чтобы автоматически загрузить и установить все доступные обновления для вашей версии Windows с серверов Windows Update (вместо локального WSUS), выполните:
В данном случае нужно подтверждать установку каждого обновления вручную. Если вы хотите исключить некоторые обновления из списка на установку, выполните:
Модуль позволяет удаленно запустить установку обновлений сразу на нескольких компьютерах или серверах (на компьютерах должен присутствовать модуль PSWindowsUpdate). Это особенно удобно, так как позволяет администратору не заходить вручную на все сервера во время плановой установки обновлений. Следующая команда установит все доступные обновление на трех удаленных серверах:
Командлет Invoke-WUJob (ранее командлет назывался Invoke-WUInstall) создаст на удаленном компьютере задание планировщика, запускаемое от SYSTEM. Можно указать точное время для установки обновлений Windows:
Удаление обновлений в Windows с помощью Remove-WindowsUpdate
Для корректного удаления обновлений используется командлет Remove-WindowsUpdate. Вам достаточно указать номер KB в качестве аргумента параметра KBArticleID. Чтобы отложить автоматическую перезагрузку компьютера можно добавить ключ –NoRestart :
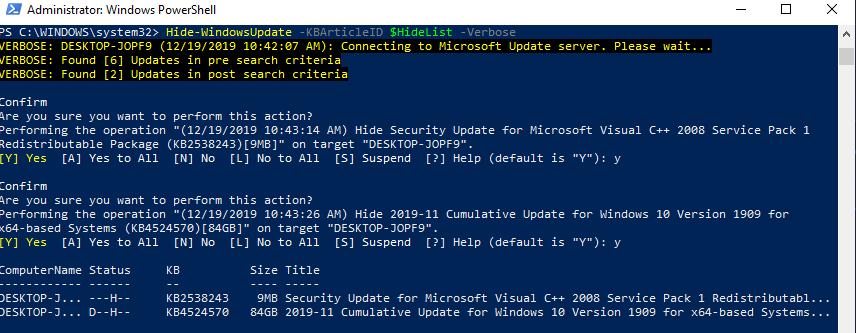
Как скрыть ненужные обновления Windows с помощью PowerShell (Hide-WindowsUpdate)?
Вы можете скрыть определенные обновления, чтобы они никогда не устанавливались службой обновлений Windows Update на вашем компьютер (чаще всего скрывают обновления драйверов). Например, чтобы скрыть обновления KB2538243 и KB4524570, выполните такие команды:
Теперь при следующем сканировании обновлений с помощью команды Get-WUlist скрытые обновления не будут отображаться в списке доступных для установки патчей.
Вывести список обновлений, которые скрыты на данном компьютере можно так:
Get-WindowsUpdate –IsHidden
Обратите внимание, что в колонке Status у скрытых обновлений появился атрибут H (Hidden).
Для тех, кто себя некомфортно чувствует в консоли PowerShell, для управления обновлениями Windows 10 могу порекомендовать графическую утилиту Windows Update MiniTool.
Configuring Fail2Ban on Zimbra by Barry De Graaff on August 24, 2022 in Product News, Community, Open Source, Security & Privacy This article is a how-to guide on installing Fail2Ban to block attacking hosts using a null route or blackhole routes. This can help mitigate brute force attacks on Zimbra. Especially brute force attacks on SMTP are very common.
Prerequisite: Fail2ban has been tested in combination with netfilter-persistent and iptables. If you use ufw or firewalld you may see errors when trying to ban/unban such as ERROR Failed to execute ban jail … action ‘route’. This article has been validated using a set-up installed using https://github.com/Zimbra/zinstaller which you can use to test fail2ban before applying to your production environment.
It is required the OIP configuration must be done before configuring Fail2Ban service.
For a Single-Server Setup: If you are running nginx on the same node as the mailstore, you will need to add both 127.0.0.1 and the real IP address of that node:
sudo -u zimbra – zmprov mcf +zimbraMailTrustedIP 127.0.0.1 +zimbraMailTrustedIP {IP of Server} zmcontrol restart For a Multi-Server Setup:
sudo -u zimbra – zmprov mcf +zimbraHttpThrottleSafeIPs {IP of Mailbox-1} zmprov mcf +zimbraHttpThrottleSafeIPs {IP of Mailbox-2} zmprov mcf +zimbraMailTrustedIP {IP of Proxy-1} zmprov mcf +zimbraMailTrustedIP {IP of Proxy-2} zmcontrol restart Installation and Configuration of Fail2Ban 1) Install Fail2Ban Package
apt-get clean all ; apt-get update apt-get install fail2ban -y 2) Create a file /etc/fail2ban/jail.local and it will override the default conf file /etc/fail2ban/jail.conf. Add the local IP address of the Zimbra server in ignoreip =. You can also add other IP addresses to ignore from Fail2Ban checking. On a multi-server setup, add all server’s IP in ignoreip list.
nano /etc/fail2ban/jail.local
[DEFAULT]

"ignoreip" can be a list of IP addresses, CIDR masks or DNS hosts.

Fail2ban will not ban a host which matches an address in this list.

Several addresses can be defined using space (and/or comma) separator.

ignoreip = 127.0.0.1/8 ::1 10.137.26.29/32

ignoreip = 127.0.0.1/8 IP-ADDRESS-OF-ZIMBRA-SERVER/32

banaction = route
Update: This article uses a regular expression that should work on most Zimbra deployments. To avoid double banning/unbanning which may lead to unpredictable results and errors this article combines the WebUI and Admin WebUI into a single jail called zimbra-web. This does mean that for most deployments a failed login will be counted double. So maxretry = 5 actually means you can try 3 times before being banned.
PROPERTY DESCRIPTION ignoreip
This parameter identifies IP address that should be ignored by the banning system. By default, this is just set to ignore traffic coming from the machine itself, which is a pretty good setting to have.
banaction
This sets the action that will be used when the threshold is reached. There is actually the name of a file located in ’`/etc/fail2ban/action.d/’’ which calls the configured action using the .conf file. Here we configured route which calls route.conf to handle the routing table manipulation to ban an IP address.
findtime
This parameter sets the window that fail2ban will pay attention to when looking for repeated failed authentication attempts. The default is set to 600 seconds (10 minutes again), which means that the software will count the number of failed attempts in the last 10 minutes.
bantime
This parameter sets the length of a ban, in seconds.
maxretry
This sets the number of failed attempts that will be tolerated within the findtime window before a ban is instituted.
4) [Optional] If you want to apply Fail2Ban for SSH then create jail file sshd.local. (No need to create filter rules for SSH, Fail2ban by default shipped with filter rules for SSH) On Ubuntu systems, SSH jail is by default enabled within the jail file “/etc/fail2ban/jail.d/defaults-debian.conf”.
6) Restart the Fail2ban service and enable it to start after system reboot.
systemctl restart fail2ban systemctl status fail2ban systemctl enable fail2ban 7) Check the status of the Fail2Ban jails.
fail2ban-client status
The result should be similar to this:
[root@centos8 ~]# fail2ban-client status Status |- Number of jail: 3 - Jail list: sshd, zimbra-smtp, zimbra-web [root@centos8 ~]# [root@centos8 ~]# fail2ban-client status sshd Status for the jail: sshd |- Filter | |- Currently failed: 0 | |- Total failed: 14 |– Journal matches: _SYSTEMD_UNIT=sshd.service + _COMM=sshd - Actions |- Currently banned: 1 |- Total banned: 2 – Banned IP list: 10.137.26.29 8) Check banned IP in routing table.
ip r
route -n
The result should be similar to this:
[root@centos8 ~]# ip r default via 10.0.10.1 dev ens3 10.0.10.0/24 dev ens3 proto kernel scope link src 10.0.10.67 unreachable 10.137.26.29 [root@centos8 ~]# [root@centos8 ~]# route -n Kernel IP routing table Destination Gateway Genmask Flags Metric Ref Use Iface 0.0.0.0 10.0.10.1 0.0.0.0 UG 0 0 0 ens3 10.0.10.0 0.0.0.0 255.255.255.0 U 0 0 0 ens3 10.137.26.29 – 255.255.255.255 !H 0 – 0 – [root@centos8 ~]# 9) Ban and unban an IP manually.
Ban an IP address.
fail2ban-client set “Jail-Name” banip “IP-Address”
Example:
fail2ban-client set sshd banip 10.137.26.29
Unban an IP address.
fail2ban-client set “Jail-Name” unbanip “Banned IP-Address”
Example:
[root@centos8 ~]# fail2ban-client set sshd unbanip 10.137.26.29
Unban everyone.
Can be useful when something goes wrong with creating new RegEx filter:
fail2ban-client unban –all
Debugging of Fail2Ban: The loglevel and target are configured in /etc/fail2ban/fail2ban.conf you can also obtain the log level and log target by running:
fail2ban-client get loglevel fail2ban-client get logtarget To watch the log for debugging purpose you can run:
tail -f $(fail2ban-client get logtarget | grep “`” | awk ‘{ print $2; }’) Fail2ban works by parsing log files using regular expressions, you can test the regular expression by using fail2ban-regex like this:
fail2ban-regex /opt/zimbra/log/mailbox.log /etc/fail2ban/filter.d/zimbra-web.conf Multi server and centralized syslog Fail2ban is designed to work on the local server. So it does it’s ban actions on the same server where it reads the logs. This can be a problem if you run Zimbra in a multi server scenario, where you can read the logs on the mailbox server, but want to apply the ban on the proxy server.
In addition you may want to use a centralized logging server and if you decide to ban a bad actor, deny access to all servers in your environment.
To do this you would need to create a custom fail2ban action. And set up SSH public key authentication so the server where you run fail2ban can connect to the server where the ban action needs to be applied. This article is not meant to cover all possible scenarios, but to get you started here is a basic example:
Create a new action by copying the default route action:
cp /etc/fail2ban/action.d/route.conf /etc/fail2ban/action.d/remote-route.conf Next replace the local ip route command with an SSH command to run remotely, from this:
[Definition] actionban = ip route add actionunban = ip route del actioncheck = actionstart = actionstop =
[Init]
Option: blocktype
Note: Type can be blackhole, unreachable and prohibit. Unreachable and prohibit correspond to the ICMP reject messages.
Values: STRING
blocktype = unreachable To this:
[Definition] actionban = ssh root@remote-server -C ip route add actionunban = ssh root@remote-server -C ip route del actioncheck = actionstart = actionstop =
[Init] blocktype = unreachable Then configure fail2ban to use the new action, in /etc/fail2ban/jail.local and /etc/fail2ban/jail.d/zimbra.local change
banaction = route … action = route to:
banaction = remote-route … action = remote-route Please note that this is meant to be a simple example to get you started, it is probably best NOT to use the root account on the remote server. But for testing this is the easiest. Once you have an idea of how it works, you will probably want to wrap the remote banaction into a script and use sudo on an account with limited access.
Which would lead to something like:
[Definition] actionban = /usr/local/sbin/my-banaction-script actionunban = /usr/local/sbin/my-unbanaction-script … Then in /usr/local/sbin/my-banaction-script you could run the banaction to any number over servers over SSH, something like:
!/bin/bash
ssh banuser@remote-proxy1 -C sudo ip route del $1 $2 & ssh banuser@remote-proxy2 -C sudo ip route del $1 $2 & …etc
 21.02.2022